Are you looking to create a multisite using WordPress? Do you have many WordPress websites?
WordPress comes with the built-in functionality where you can install a single WordPress and run many websites using the same installation. This change has come into effect after WordPress version 3.0 where WordPress MultiUser Project is no longer in use. Since then all the features of WPMU is available in WordPress.
I use WordPress multisite. Creating a multisite is easy as you need to have WordPress installed and add some code on the wp-config.php file and that’s it. Your WordPress Multisite is ready.
If you are a WordPress Beginner, you can easily create your WordPress site in minutes.
Here in this post, I will show you step by step process on how you can create your own WordPress Multisite.
Introduction to Multisite
So, what is a multisite? A WordPress Multisite allows you to create a network of sites with a single WordPress installation. That is you need to install WordPress only once and you can create as many as WordPress sites.
It enabled you to manage many sites using the same username and password. You can even let other users sign in to any of your specific websites and manage them. The one thing that you need to know is that the WordPress installation is exactly the same for the Multisite. Updating WordPress Multisite is same as updating Standard WordPress site.
All your themes and plugins are available on your server, which is the standard default location. Once you install all the themes and plugins you can create as many as sites for your needs.
With that said, you can enable the themes once by using Network Enable option. But activating the plugins would be better on individual sites. The reason is that some of the themes won’t be compatible with the plugins that you active for all the WordPress sites.
Pros and Cons of using a Multisite.
There are some advantages and disadvantages of using a WordPress Multisite. In many situations creating a multisite would have many limitations.
Here are some of the advantages of using a WordPress Multisite.
- As a super-admin of the site, you can manage all the websites from a single dashboard using the same username and password.
- Each WordPress site has its own admin which he/she can manage his/her own site.
- The Super Admin has the power to install themes and plugins on the Multisite Network which is limited to site admins.
- With the one-click update, you can update your WordPress, themes, and plugins.
Cons of using WordPress Multisite.
Creating a multisite is not always helpful in managing WordPress sites. Because this requires lots of server resources and security related issues.
Here are some of the disadvantages of creating a WordPress Multisite.
- All the sites use the same resources which is the same WordPress installation and databases. So if one of the networks is down then the whole multisite will be down.
- If you do not have enough server resources then due to high traffic on one of your sites, the other sites also get affected.
- One of the main security concern, if one of your sites is hacked then all your WordPress networks get hacked.
- If you active plugin for all network then it might be possible that it will not be compatible with other sites.
Who needs a WordPress Multisite?
Creating a WordPress website is easy because you only need to manage a single website. But managing many websites on a single WordPress installation would be hard. There are many tools and plugins like InfiniteWP and ManageWP which you can use to manage Multisites.
Let’s check on some of the situations where one should use WordPress Multisite.
- If you are a large enterprise selling different products then you need to have a multisite.
- A Businessperson with different businesses like food chain restaurants, real-estate, e-commerce store then you need to have a multisite.
- A single business with many locations and branches should definitely have a multisite.
- If you are a blogger then create a multisite for food, travel, or any niche topics for your blogs.
Requirements for having a multisite.
You have decided that you need a WordPress multisite but before you do that you need to make sure the required resources for creating a multisite? All the multisite will be hosted on a single hosting service provider. So you need to get the best WordPress hosting service provider for your WordPress Multisite. I would definitely recommend and use Bluehost for my WordPress Multisite installation.
So right then, If you have chosen Bluehost then you need to make sure what type of hosting you are going to buy for your site. If you are building a couple of sites with less traffic then I would recommend going for shared hosting.
But, as the business expands there will be chances for building new sites and also more traffic on your website so better go for VPS hosting. I recommend you go for VPS hosting but as mentioned this depends on the nature of your business.
If you are looking for an alternative hosting service then you can choose Siteground, GoDaddy or Hostgator for your Multisite hosting service.
Having a subdomain or subdirectory for your multisite.
So, you have your hosting service and now you are ready to build your own WordPress Multisite. But before, we move forward you need to decide that if you are creating a multisite using a subdomain or a subdirectory.
On a WordPress multisite network, you can either choose to have a subdomain or a subdirectory. Having a subdirectory is like creating a subfolder within the main WordPress installation path.
With a subdomain, you can have your subdomain name before your main domain URL name.
Example of subdirectory: http://yoursite.com/site1
Example of a subdomain: http://site1.yoursite.com
You see the difference between the two as your new site name will either be shown at the start or at the end of your main domain name.
If you are looking to create a subdomain site then you need to create a wildcard subdomain setting on your cPanel hosting dashboard. But if you choose to have a subdirectory then you can skip this step and install WordPress from your admin panel.
Setting WildCard Subdomains.
If you are looking to create a subdomain then you need to create a wildcard domain on the cPanel of your hosting service. You need to login to your cPanel hosting service dashboard and you will find an option for Subdomains.
Click on that option and you will redirect to create a subdomain option. Since I have recommended Bluehost so the panel would show as per the screenshot.
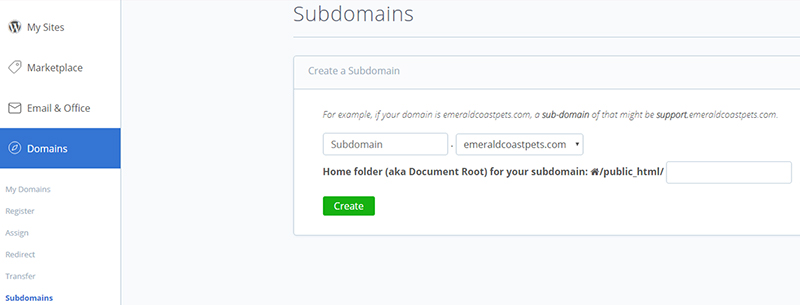
If you have opted for Siteground or another hosting service, then you don’t need to panic as all the settings are the same dashboard may look different.
You need to put a * sign to create a subdomain and choose the main domain name from the dropdown. Once you do that you need to click on the create button and your subdomain gets created.
Allow multisite Network option
Now, we are almost halfway down the road for creating a multisite. Once you have configured the cPanel settings (for subdomains) you need to install WordPress. Like standard WordPress installation, you need to install WordPress on your server.
If you are creating a multisite from an existing WordPress installation then I recommend that you take the complete database backup and then proceed further. But if you are building from scratch then no problem you can proceed further.
Once you install WordPress on your server you need to locate the wp-config.php file and edit that file. You can edit the file using FTP using FileZilla app or from your cPanel hosting server and click on File Manager to locate the wp-config.php file.
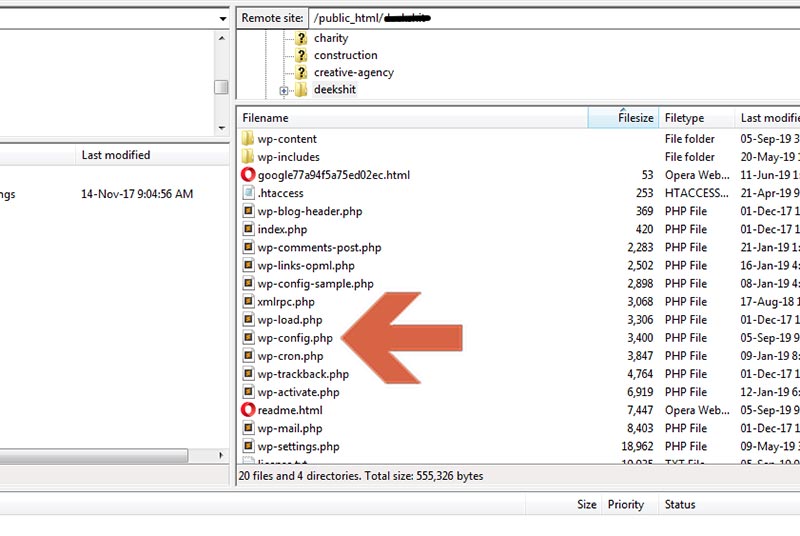
Paste the following code on the wp-config.php file before the /* That’s all, stop editing! Happy blogging. */ line.
/* Multisite */

define( 'WP_ALLOW_MULTISITE', true );
Once you add this code, click on save or upload the file. This code specifies that the multisite feature has is enable on your site.

After saving the wp-config.php file you will see a new option on your WordPress admin panel. You need to head over to Tools >> Network Setup section.
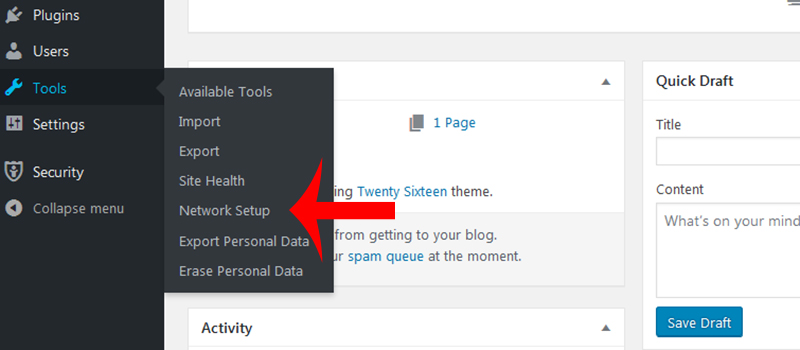
You need to select whether your site will be a subdomain or a subdirectory site. Remember we have set up a WildCard domain on cPanel server, here you need to choose subdomain option. If you need a subdirectory then choose Subdirectory option
You need to type the name of your Network which can be anything that you like and also your email address of your Network Admin. Click on Install to make sure that the WordPress installation is ready to use.
You will see 2 sections where some codes need to be added on the wp-config.php file and .htaccess file. Now, connect to your FTP server using FileZilla and edit the wp-config.php file.
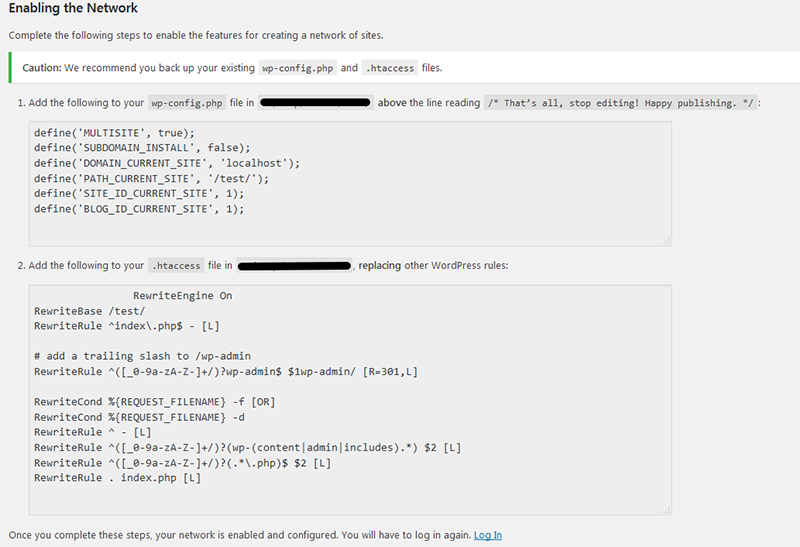
You will find clear instructions to add the following code and on which section on the relevant files. Once you add this code on the 2 files you need to re-login on your WordPress dashboard.
Adding new sites
After you log in to your site you will see your Multisite options to create new sites. You need to click on Network Admin >> Sites where you can create new sites for your multisite.
Here, you will see many multisite installations that you have installed. Since the site is brand new you will see only your primary main site which you have created during your standard WordPress installation.
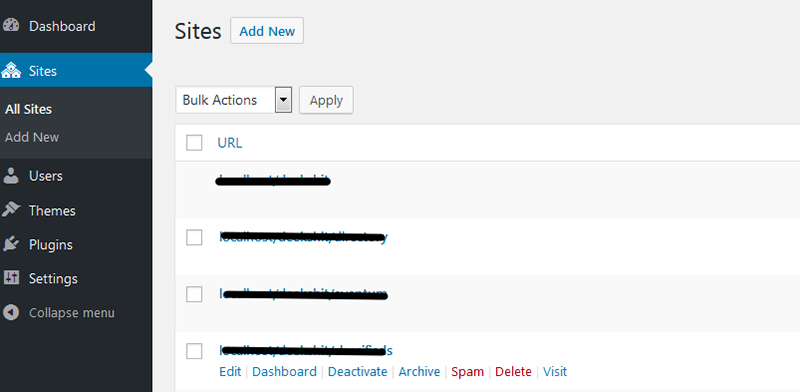
Click on Add New button, and you will see options to add your Site Address URL and Site Title.
(Note: If you have chosen subdomain then the URL will be different, but if you select subdirectory then URL would be after the main domain name)
Select your site language which will be same for all the multisite and add your network admin email for notifications. Finally, click on Add site and your first multisite is ready.
If you have new users you can create from the Network Admin >> Users section and assign them the relevant role. This will also send them a notification email that they are the admin of one of the relevant multisite.
Installing themes and plugins on the multisite
Since you are the network admin of the Multisite network then only you can install themes and plugins. Individual site administrators cannot add any new themes or plugins on the network site.
To install themes you need to navigate to Network Admin >> Themes section. Here you will see the number of themes that you have installed on your network multisite.
Click on Add New button to install new themes for your multisite. With that done you can add as many as themes you like. Once you install the themes you need to click on Network enable on each of the themes so that they can see on every individual site.
There are many WordPress theme providers from which you can choose and purchase a premium theme for your site. Furthermore, Themeforest is one such marketplace where you can find top selling WordPress theme with great design and for every industry.
Settings up a Default theme
Once you install your multisite, WordPress will activate the default WordPress theme for each new site that you create. This can be either default Twenty Seventeen or Twenty Nineteen theme.
If you wish you can add your own default theme when you create a new site. Add a piece of code on the wp-config.php file by using FTP server.
// Setting default theme for new sites
define(‘WP_DEFAULT_THEME’, ‘your_theme’);
Replace ‘your_theme’ with your default theme name and save the file.
Installing a plugin on a multisite
A plugin can always extend and expand the features of WordPress. Only the Super Admin or the Network admin has the capability to install or delete a plugin on the multisite network. You can do that by navigating from Network Admin >> Plugins section.
In this section, you will see the list of plugins which gets installed on your Multisite.
Click on Add New and you can install the plugin as you like.
(Note: Some of the plugins may not support all your themes if you Network enable them)
It is always wise that you activate only that plugins which are compatible and support for multisite. Basic Plugins like Contact Form 7, Yoast SEO, W3 Total cache and many more.
You can check out the list here 25+ WordPress plugins that you need for your website.
If you have installed different themes from different theme providers then I would recommend that you activate plugins for that individual particular site not for the whole multisite.
Point to remember: If you as a Network admin has activated the plugin from Network Admin >> Plugins section then individual site admins cannot deactivate or delete that plugins.
Bonus:
Configuring Network Settings
Now, you have installed and integrated your WordPress multisite. Now its time to make some basic settings which you can do as a Network Admin for your site. You need to navigate to Network Admin >> Settings and configure your admin settings as per your requirements.
The first option you will see is the Network Settings where you will find the name of your Site Title and Admin Email fields.
Next, will be the Registration settings. By default, site registrations will be disabled. You can enable the option as per your needs. If you select both sites and user account to be registered then all your sites will have the register option to register new users on your individual sites.
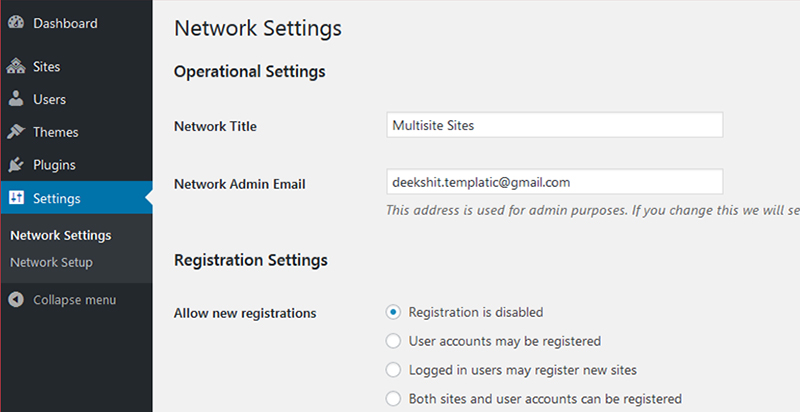
You can check Add New users where your individual site administrators can add new users on their sites.
New Site Settings, will provide you the option to change the default email templates when you register, comment or publish a post on your WordPress site.
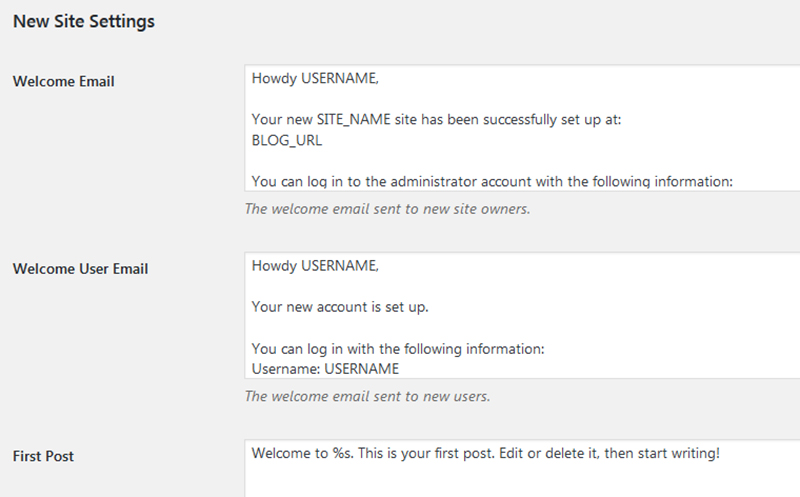
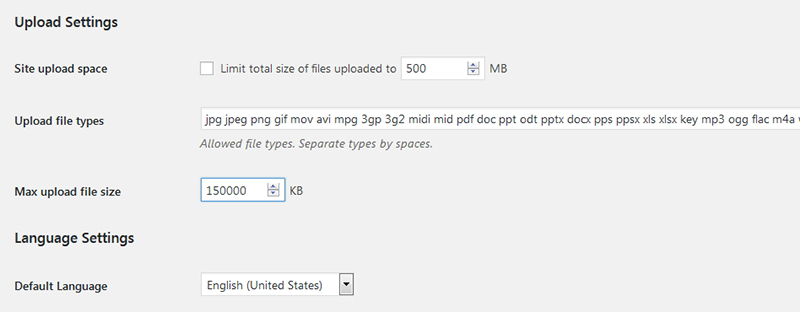
Upload Settings is an important part of your Multisite Network settings as this will notify the usage on your server resources. The default value is 100MB which is enough for uploading 1000 images based on the image size if you have optimized the images.
Also, you can specify the image format as what type of upload formats to get uploaded on your site whether it is jpg, png, jpeg,mp4 or 3gp.
Plugin Menu Settings will ensure that if the site administrators have the right to activate or deactivate the plugin on their individual sites. But adding new plugins will restrict for site admins.
After making all the changes make sure that you have clicked on ‘Save Changes’ button and save all the multisite configuration settings.
Checking on Database structure
Since you have figured out how to install WordPress and install a Multisite WordPress. You will be thinking as what will be the database structure of your WordPress Multisite.
By default, the WordPress standard installation has the following tables which start with the prefix wp_ and all the tables names will start with the same prefix in standard single site WordPress installation.
wp_commentmeta
wp_comments
wp_links
wp_options
wp_postmeta
wp_posts
wp_terms
wp_termmeta
wp_term_relationships
wp_term_taxonomy
wp_usermeta
wp_users
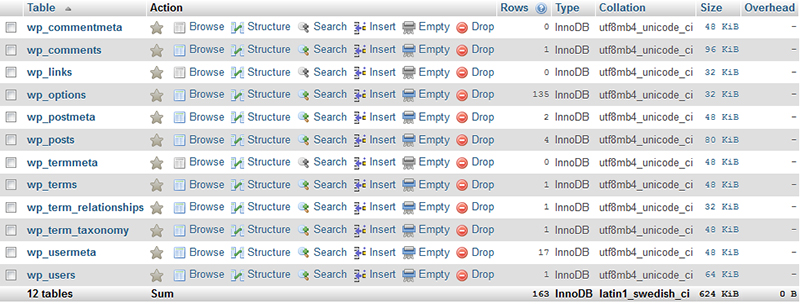
Once you have integrated multisite you will find new columns and some updated tables on your database.
wp_blogs → NEW
wp_blogs_versions → NEW
wp_commentmeta → refers to main site
wp_comments → refers to main site
wp_links → refers to main site
wp_options → refers to main site
wp_postmeta → refers to main site
wp_posts → refers to main site
wp_registration_log → NEW
wp_signups → NEW
wp_site → NEW
wp_sitemeta → NEW
wp_terms → refers to main site
wp_termmeta → refers to main site
wp_term_relationships → refers to main site
wp_term_taxonomy → refers to main site
wp_usermeta → UPDATED
wp_users → UPDATED
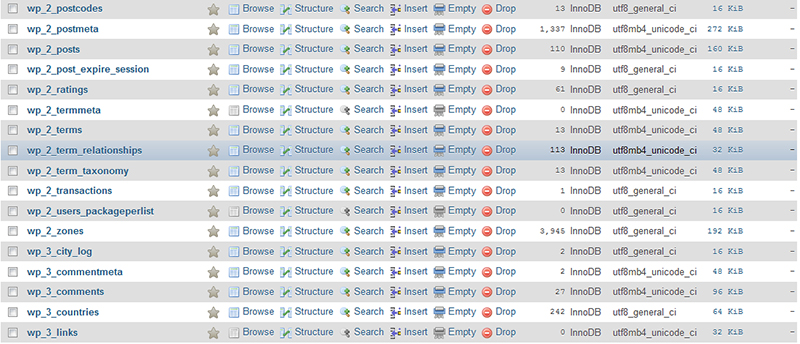
While new sites that you create on the multisite network, some of the tables will get updated but with the new sites new tables will get created with their respective data.
wp_2_commentmeta
wp_2_comments
wp_2_links
wp_2_options
wp_2_postmeta
wp_2_posts
wp_2_terms
wp_2_termmeta
wp_2_term_relationships
wp_2_term_taxonomy
You can see the site_id gets added after the wp_2 prefix. This indicates that the new site id will be termed as ‘2’. The same way if you create a new site the id will change to ‘3’ and wp_3 prefix table name will get created on your database. The rest of the tables will be the same as wp_users and wp_usermeta where all the user information will get stored.
Conclusion
I hope this article has helped you in creating a WordPress Multisite. You can also check on our post WordPress for Beginners to know basic feature of WordPress Admin panel.
I would love to hear from you, Have you created your WordPress Multisite and how many sites you have created? Do let me know by posting your comments below and I would appreciate it to show some love by sharing this post on social media and other platforms.
Thank you for your time and do follow my other posts for more WordPress tutorials and guides. Take Care 😉
