Looking to create a pop-up form in WordPress can be a useful way to engage your website visitors, capture leads, promote special offers, or deliver important messages.
If you are new to WordPress and want to generate leads and collect emails from your users then pop-ups are the best way to do that. There are many ways where you can trigger pop-ups on your WordPress website.
You can either use a plugin or you can add custom code to create custom WordPress opt-in pop-ups. Apart from that you can use Elementor Pop-Up Builder to create custom poo-up templates. Similarly, you can also use embedding pop-ups in WordPress using the Gutenberg Block editor. In this post, we will show you multiple ways to create pop-up forms in WordPress.
Why do you need Pop-Ups in WordPress?
In WordPress, pop-ups get displayed as a form of website interaction to display important messages, notifications, offers, or calls to action (CTAs) to visitors. They appear as a small window or overlay that pops up on top of the main content of a webpage. Pop-ups serve various purposes and enhance user experience. Furthermore, it improves engagement and achieves specific goals.
Here are some common reasons why pop-ups are a great deal in WordPress:
- Collecting Email Subscriptions: Pop-ups are often used to encourage visitors to subscribe to newsletters or mailing lists. This helps website owners build their email lists and establish a direct channel of communication with their audience.
- Announcements and Updates: Important announcements or updates gets displayed using pop-ups. This is to ensure that visitors are immediately informed about crucial information related to the website, products, or services.
- Promotions and Offers: Pop-ups can show banners to promote sales, discounts, and special offers. Additionally, it displays limited-time deals to attract visitor’s attention and drive conversions.
- Lead Generation: Pop-ups can include lead magnets, such as free e-books, whitepapers, or resources. This is to entice visitors to provide their contact information, enabling further communication and potential conversions.
- Exit-Intent Pop-ups: These pop-ups can get triggered when a user shows intent to leave the website. Like moving the cursor toward the browser’s close button. Exit-intent pop-ups can offer last-minute incentives or capture feedback before the visitor leaves the site.
- Age Verification: Websites selling age-restricted products, such as alcohol or tobacco, may use pop-ups to verify visitors’ age before allowing access to certain content.
- Cookie Consent: Pop-ups can be used to notify users about the use of cookies on the website. This is to seek their consent in compliance with privacy regulations.
- Surveys and Feedback: Pop-ups can prompt visitors to participate in surveys or provide feedback. Additionally, it helps website owners gather valuable insights to improve their offerings and user experience.
- Social Media Engagement: Pop-ups can be employed to encourage users to follow the website’s social media profiles. Moreover, they can also share content on their own social media channels.
It is essential to use pop-ups judiciously, as overly intrusive or irrelevant pop-ups may annoy users and lead to a negative user experience. Many WordPress plugins are available to help users implement and customize pop-ups easily. Moreover, it allows them to control the timing, appearance, and behavior of these elements on their websites.
How to create a pop-up using a WordPress Plugin?
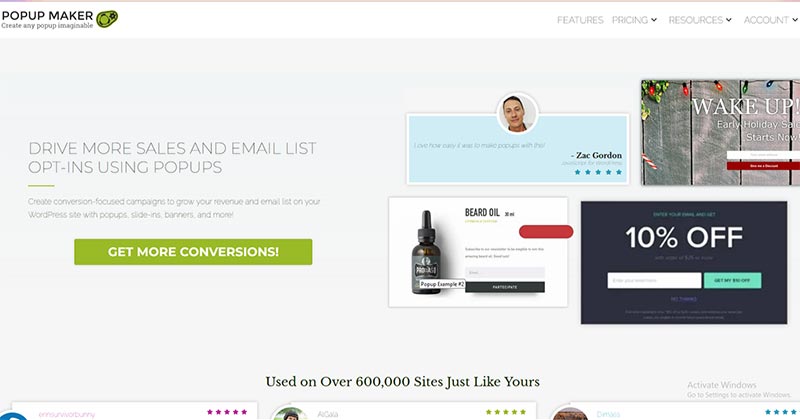
In this guide, I will walk you through the process of creating a popup in WordPress using a plugin called “Popup Maker.” This popular plugin allows you to create customizable popups with various triggering options. Let’s get started!
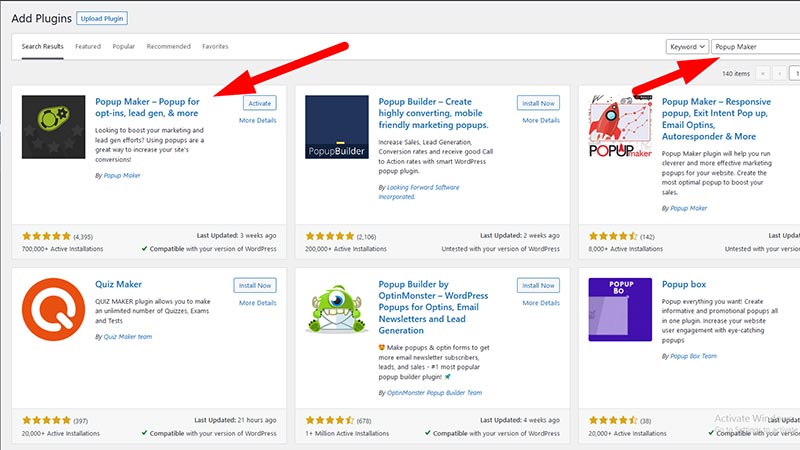
Step 1: Install and Activate the Popup Maker Plugin The first step is to install and activate the Popup Maker plugin. Follow these steps:
- Log in to your WordPress admin dashboard.
- Navigate to “Plugins” -> “Add New.”
- In the search bar, type “Popup Maker.”
- Locate the “Popup Maker” plugin by WP Popup Maker and click on the “Install Now” button.
- After installation, click on the “Activate” button to activate the plugin.
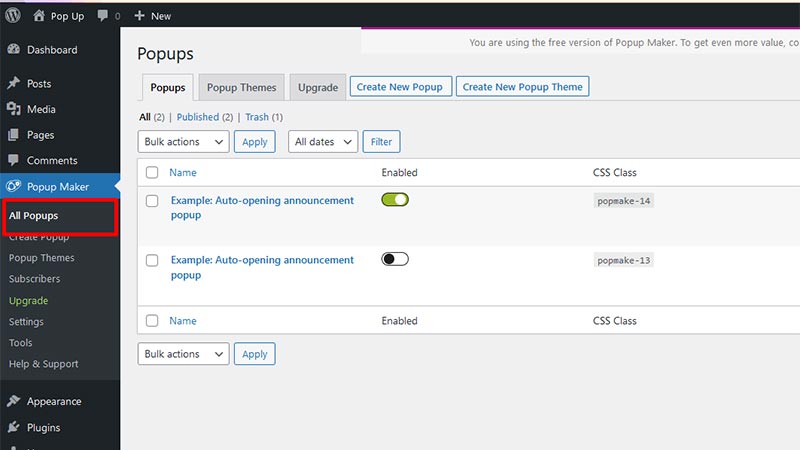
Step 2: Create a New Popup Once the plugin is activated, you can start creating your first popup. Follow these steps:
- From the WordPress admin dashboard, navigate to “Popup Maker” -> “All Popups.“
- Click on the “Add Popup” button.
- Give your popup a name and configure the settings as per your requirements. You can set the width, height, animation effects, and other visual options.
- Under the “Content” tab, you can add the content for your popup. You have various options like adding text, images, videos, or even custom HTML code.
- Configure the display settings such as the triggering conditions, targeting options, and display rules. In addition, you can choose when and where the popup should appear, such as on specific pages or after a certain delay.
- Customize the appearance of your popup using the available options under the “Appearance” tab. You can choose the background color, font styles, button styles, and more.
- Save your changes once you’re satisfied with the popup configuration.
Step 3: Configure Popup Triggers Popup Maker offers various triggering options to control when and how the popup appears. Here are a few common trigger options:
- Click Trigger: The popup appears when a user clicks on a specific element or link.
- Exit Intent Trigger: The popup appears when a user is about to leave the website.
- Scroll Trigger: The popup appears when a user scrolls to a specific position on the page.
- Time Delay Trigger: The popup appears after a certain time delay. You can choose one or more trigger options based on your requirements. Configure the trigger settings under the “Triggers” tab while creating or editing your popup.
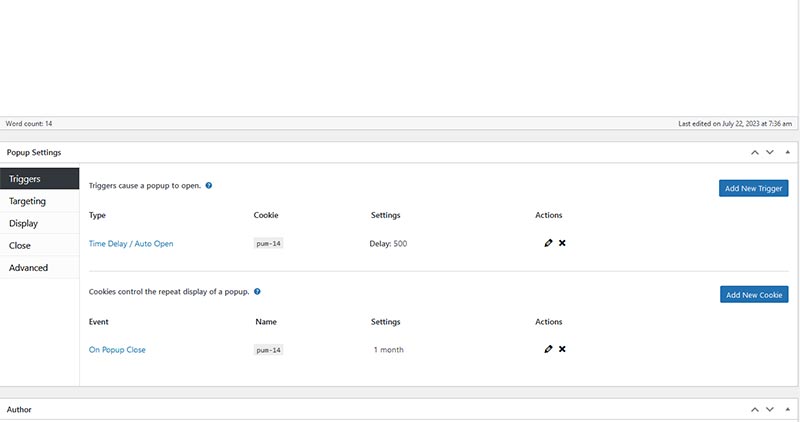
Step 4: Advanced Configuration (Optional) Popup Maker provides advanced configuration options to enhance the functionality of your popups. Here are a few examples:
- Integrations: You can integrate your popup with popular email marketing services like MailChimp, AWeber, or ConvertKit to capture leads.
- Conditional Logic: You can add custom conditions to control when the popup should appear based on specific user behavior or other factors.
- Cookie Settings: You can set cookies to control the frequency of the popup appearance, preventing it from showing repeatedly to the same user.
- Analytics: Popup Maker allows you to track the performance of your popups using Google Analytics or other tracking services.
Step 5: Publish and Test Your Popup Once you have configured your popup to your satisfaction, it’s time to publish it on your website. Follow these steps:
- Save your changes and exit the popup editor.
- From the “All Popups” screen, locate your newly created popup and click on the “Publish” button.
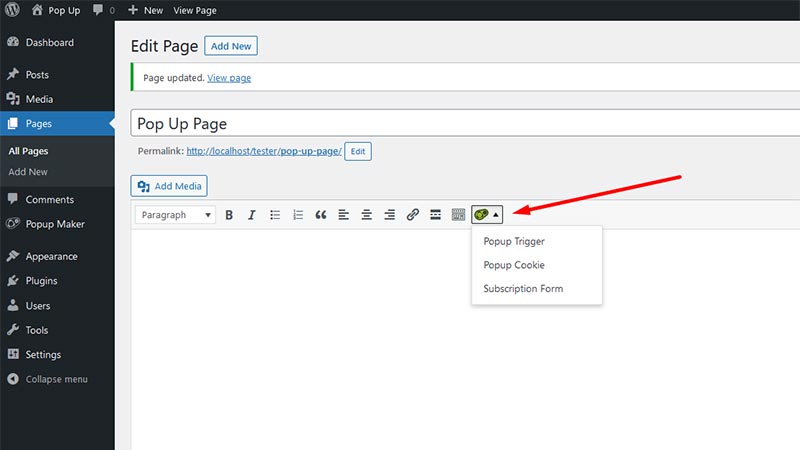
- Popup Maker provides you with a shortcode for each popup. You can copy the shortcode and paste it into any post, page, or widget where you want the popup to appear.
- Visit your website and test the popup to ensure it appears and functions correctly. Make any necessary adjustments if needed.
Congratulations! You have successfully created a popup in WordPress using the Popup Maker plugin. Remember to monitor the performance of your popups, analyze user interactions, and make
adjustments as necessary to improve engagement and conversion rates.
How to create a pop-up form in WordPress without a plugin?
Creating a pop-up form in WordPress without using a plugin can be achieved by following a series of steps. In this guide, I will outline the process in detail. Please note that this method assumes you have a basic understanding of HTML, CSS, and WordPress theme development. Let’s get started!
Step 1: Create a Child Theme To ensure that your changes are not overwritten during theme updates, it is recommended to create a child theme. This will allow you to make modifications to your theme without affecting the original files. Create a new folder in the “wp-content/themes” directory and name it something like “my-child-theme“.
Step 2: Create a Template File Inside your child theme folder, create a new file, and name it something like “pop-form.php“. This file will serve as the template for your pop-up form.
Step 3: Add HTML Markup Open the “pop-form.php” file in a code editor and start by adding the HTML markup for your pop-up form. You can customize this form according to your requirements.
Here’s a basic example:
<div id=”pop-form-wrapper”>
<div id=”pop-form-content”>
<h2>Subscribe to our Newsletter</h2>
<form id=”pop-form” action=”” method=”post”><input name=”email” required=”” type=”email” placeholder=”Your Email” />
<input type=”submit” value=”Subscribe” /></form></div>
</div>
Step 4: Add CSS Styling To style your pop-up form, you need to add CSS rules. Create a new file in your child theme folder and name it “style.css“. Open the file and add the following CSS code:
#pop-form-wrapper {
display: none;
position: fixed;
top: 0;
left: 0;
width: 100%;
height: 100%;
background-color: rgba(0, 0, 0, 0.5);
z-index: 9999;
}#pop-form-content {
position: absolute;
top: 50%;
left: 50%;
transform: translate(-50%, -50%);
background-color: #fff;
padding: 20px;
width: 300px;
text-align: center;
}#pop-form h2 {
margin-top: 0;
}#pop-form input[type=”email”] {
width: 100%;
padding: 10px;
margin-bottom: 10px;
}#pop-form input[type=”submit”] {
width: 100%;
padding: 10px;
background-color: #333;
color: #fff;
border: none;
}
Step 5: Enqueue Stylesheet and JavaScript To load the CSS styles and any necessary JavaScript, you need to enqueue them in the functions.php file of your child theme. Open the functions.php file and add the following code:
function enqueue_pop_form_scripts() {
wp_enqueue_style(‘pop-form-style’, get_stylesheet_directory_uri() . ‘/style.css’);
wp_enqueue_script(‘pop-form-script’, get_stylesheet_directory_uri() . ‘/script.js’, array(‘jquery’), ‘1.0’, true);
}
add_action(‘wp_enqueue_scripts’, ‘enqueue_pop_form_scripts’);
Step 6: Add JavaScript Functionality Create a new file in your child theme folder and name it “script.js“. Open the file and add the following JavaScript code:
jQuery(document).ready(function($) {
// Show the pop-up form
$(‘#pop-form-wrapper’).fadeIn(500);// Close the pop-up form when clicking outside the form
$(document).mouseup(function(e) {
var container = $(‘#pop-form-content’);
if (!container.is(e.target) && container.has(e.target).length === 0) {
$(‘#pop-form-wrapper’).fadeOut(500);
}
});// Prevent form submission and handle the data
$(‘#pop-form’).submit(function(e) {
e.preventDefault();
var email = $(this).find(‘input[name=”email”]’).val();// Perform any necessary actions with the email data
// Close the pop-up form
$(‘#pop-form-wrapper’).fadeOut(500);
});
});
Step 7: Display the Pop-Up Form To display the pop-up form on your WordPress site, you need to include it in a template or a specific page. You can do this by creating a new page template or modifying an existing one. Open the desired template file and add the following code:
<?php
/* Template Name: Pop-up Form Template */
get_header();
?>
<!– Your existing template content here –>
<?php get_template_part(‘pop-form’); ?>
<!– Your existing template content here –>
<?php get_footer(); ?>
Step 8: Create a WordPress Page Go to your WordPress admin area and create a new page. Select the “Pop-up Form Template” as the template for this page. Save the page and publish it.
Finally! You have now created a pop-up form in WordPress without using a plugin. Visitors to the page with the pop-up form template will see the form displayed as a pop-up. You can customize the form’s appearance, behavior, and data handling based on your specific requirements by modifying the HTML, CSS, and JavaScript code provided.
Remember to test your pop-up form thoroughly and ensure it works as expected.
How to add a pop-up in WordPress using Elementor?
Adding a pop-up form in Elementor is a great way to capture leads and engage with your website visitors. Elementor is a popular WordPress page builder that allows you to create and customize your website easily. In this guide, I will walk you through the step-by-step process of adding a pop-up form using Elementor. Let’s get started!
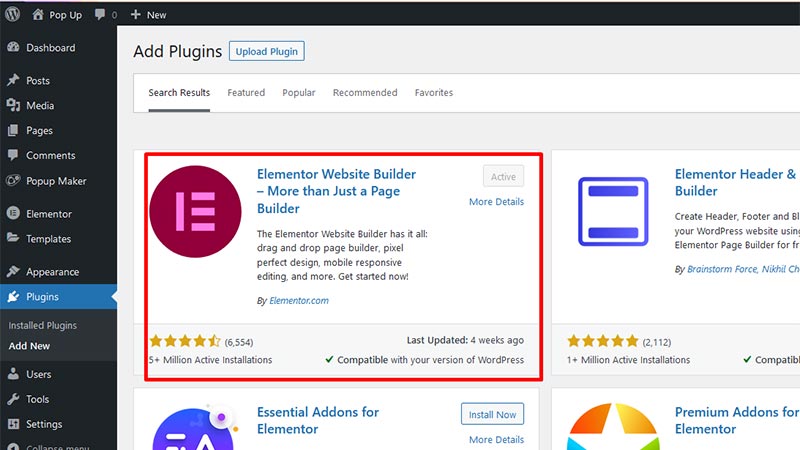
Step 1: Install and Activate Elementor Before you can add a pop-up form, make sure you have Elementor installed and activated on your WordPress website. You can do this by going to the “Plugins” section in your WordPress dashboard, searching for Elementor, and clicking on “Install Now” and then “Activate.”
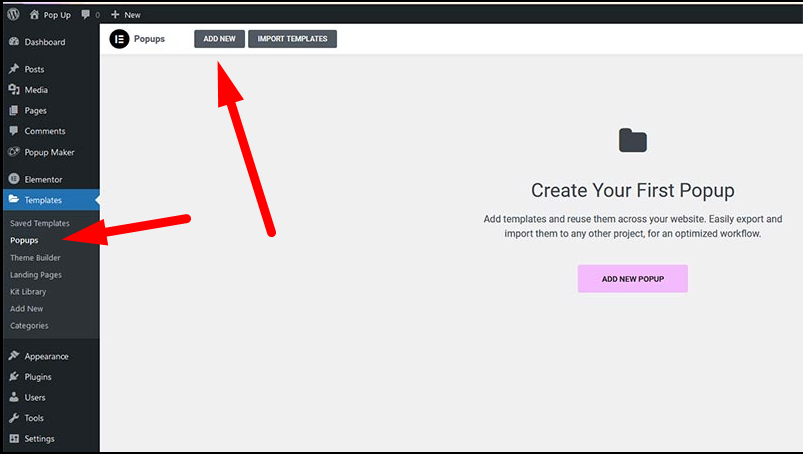
Step 2: Create a New Popup Once Elementor is activated, go to the WordPress dashboard and click on “Templates” under the Elementor tab. Then, click on the “Popups” tab and select “Add New Popup.”
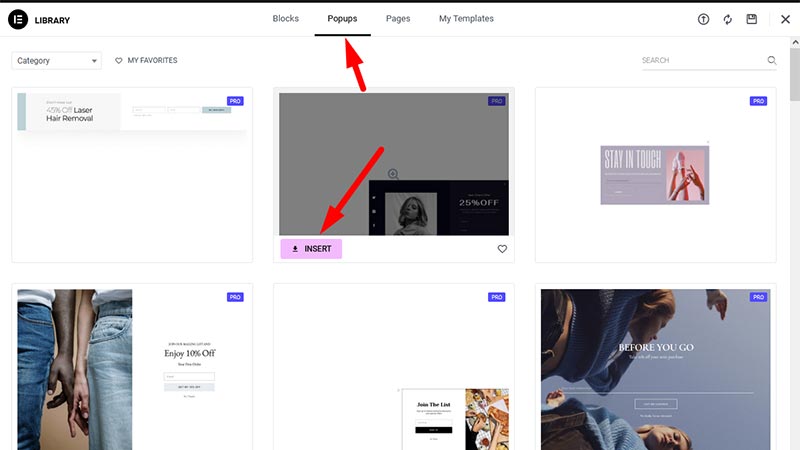
Step 3: Choose a Popup Template Elementor provides various pre-designed popup templates to choose from. You can browse through the available options and select the one that suits your needs. You can preview the templates by clicking on them, and once you find the one you like, click on the “Insert” button.
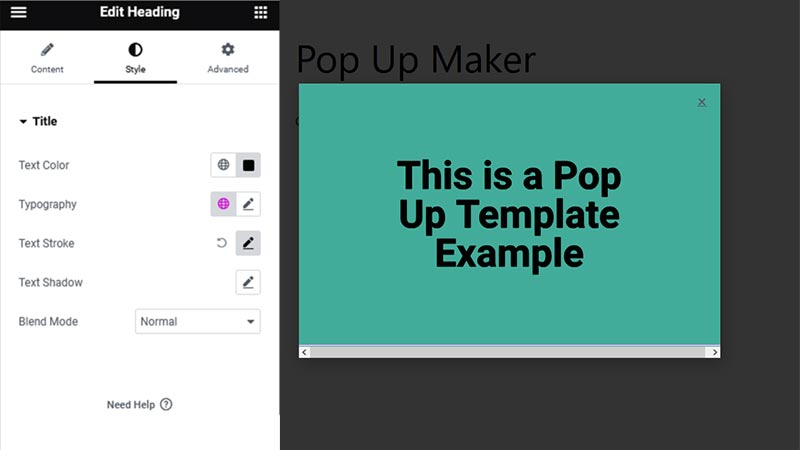
Step 4: Customize the Popup Form After selecting a template, you will be taken to the Elementor editor where you can customize the pop-up form. You can modify the text, colors, fonts, and other design elements of the form to match your website’s branding. To edit a particular element, simply click on it, and the editing options will appear on the left sidebar.
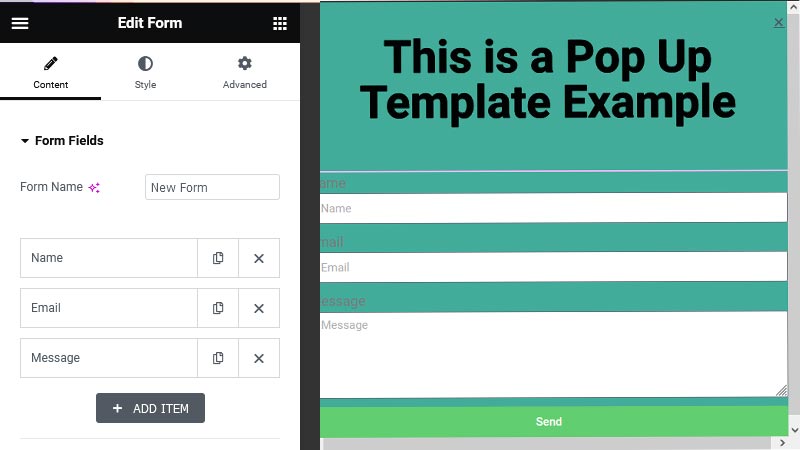
Step 5: Add Form Fields To add form fields to your pop-up form, you can use the “Form Fields” widget in Elementor. Drag and drop the widget onto your pop-up form and customize it according to your requirements. You can add fields like name, email address, phone number, etc. To configure each form field, click on it, and the editing options will appear on the left sidebar.
Step 6: Set Form Submission Actions Once you have customized the form fields, you need to set the form submission actions. There are many form builder plugins that you can use as they are compatible with the Elementor plugin.
Step 7: Configure Popup Settings To configure the settings for your pop-up form, click on the gear icon at the bottom left corner of the Elementor editor. This will open the “Popup Settings” panel. Here, you can set the trigger conditions for displaying the pop-up form, such as time delay, exit intent, or clicking on a specific element. You can also customize the display options like animation, size, position, etc.
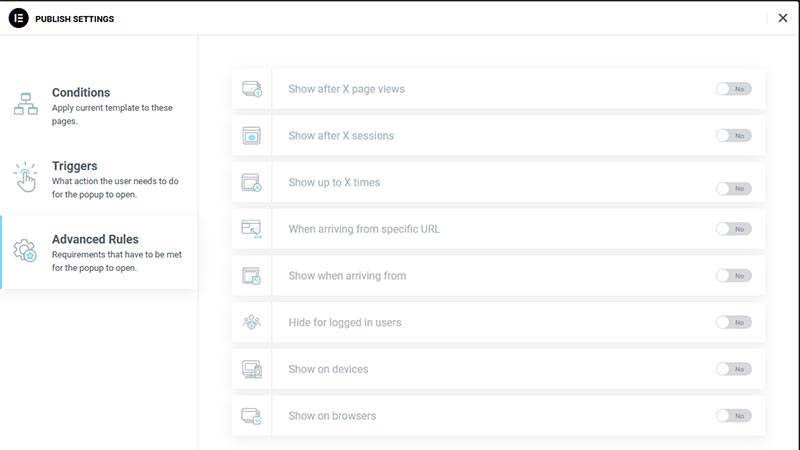
Step 8: Save and Publish the Popup Once you have finished customizing the pop-up form and its settings, click on the “Save” button to save your changes. After saving, you can click on the “Publish” button to make the pop-up form live on your website.
Step 9: Add the Popup to a Page To add the pop-up form to a specific page on your website, create a new page or edit an existing one using Elementor. Drag and drop any widget in my case the “Button” widget and from the Dynamic content you can choose the pop-up option.
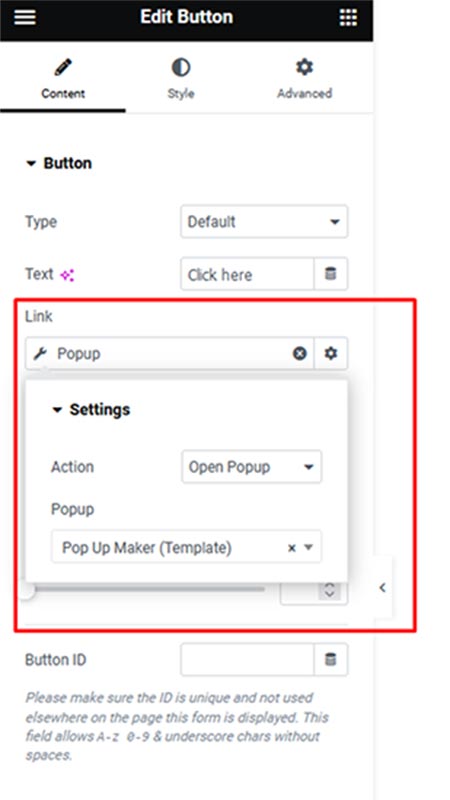
Step 10: Preview and Test Before making your pop-up form live, it’s important to preview and test it to ensure everything is working correctly. You can use the Elementor preview button to see how the pop-up form appears and behaves on your website. Finally, test the form submission, check the email notifications and verify that any integrations are working as expected.
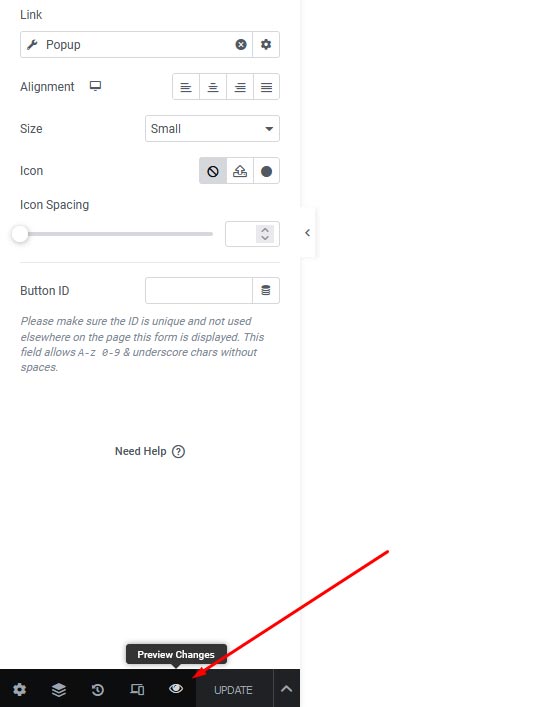
In conclusion! You have successfully added a pop-up form in Elementor. This form will help you capture leads and engage with your website visitors effectively. Remember to regularly monitor and optimize your pop-up form’s performance to maximize its effectiveness in converting visitors into subscribers or customers.
There are many Elementor addons that are compatible and you don’t need to opt for the Elementor PRO version to create a pop-up builder in WordPress.
How to add a pop-up form in WordPress using Gutenberg?
WordPress is a versatile content management system that allows users to create and customize websites easily. With the introduction of the Gutenberg editor, creating engaging and interactive content has become even more accessible. In this guide, we’ll explore how to create a pop-up using Gutenberg in WordPress. There are multiple Gutenberg Block Plugins that you can use to trigger pop up in WordPress.
To create a pop-up using Gutenberg, follow the steps below:
Step 1: Install and Activate a Pop-up Plugin To add pop-up functionality to your WordPress website, you’ll need to install and activate a suitable pop-up plugin. There are several pop-up plugins available in the WordPress plugin repository. Some popular options include The Plus Blocks, Essential Blocks, and OptinMonster.
For the purpose of this guide, let’s assume you’ve chosen the Popup Maker plugin. Install and activate the plugin by navigating to your WordPress dashboard, selecting “Plugins,” clicking on
“Add New,” and search for “The Plus Blocks for Gutenberg.” Once you find the plugin, click on “Install Now” and then “Activate” to activate the plugin.
NOTE: The Pop Builder feature is only available on the PRO version of The Plus Blocks.
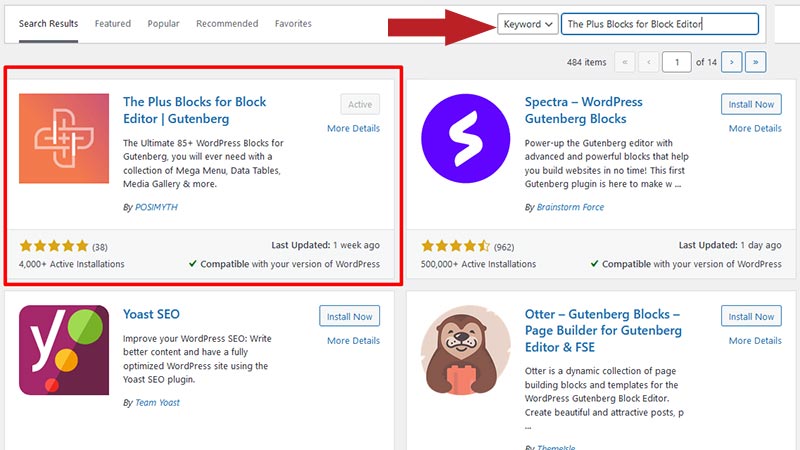
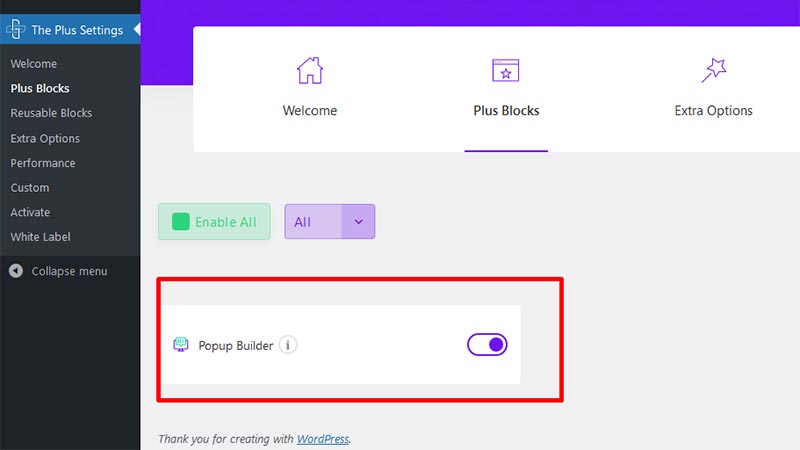
Step 2: Create a New Pop-up After activating the Popup Maker plugin, you’ll find a new menu item called “The Plus Settings” in your WordPress dashboard. Click on “Plus Blocks” to access the area of the block.
Search and Enable the “PopUp Builder” block and click on “Save“. Now, Navigate to the new page and edit the page and search for the Pop Up Block, and design and configure your pop-up.
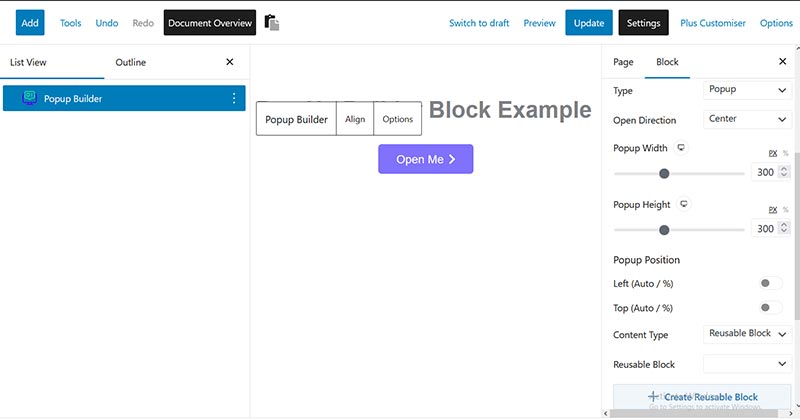
Step 3: Design Your Pop-up Within the Gutenberg editor, you can utilize the various blocks and customization options to design your pop-up. Popup Builder provides a dedicated “Reusable” block that you can insert into your pop-up template.
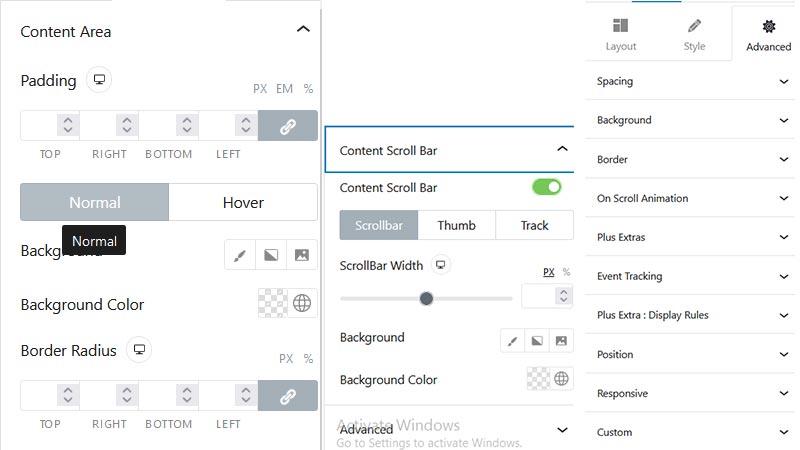
You can customize the appearance of the pop-up block by adjusting the block settings. This includes setting the dimensions, background color, typography, animations, and more. Additionally, you can add other blocks to the pop-up, such as images, text, buttons, forms, or any other content that you want to include.
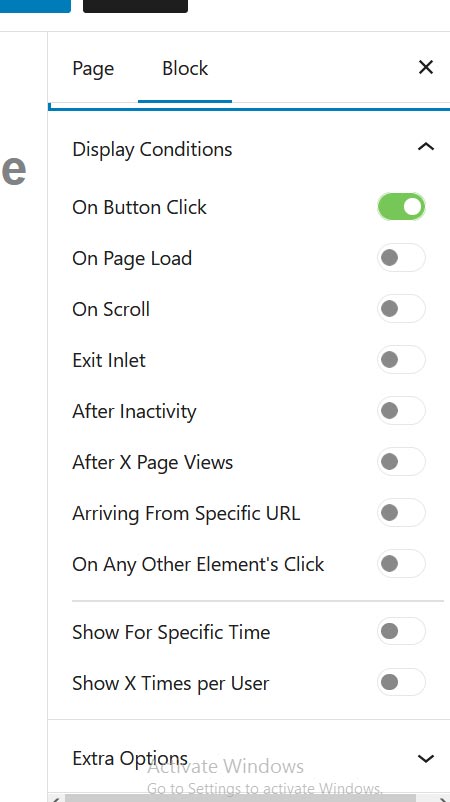
Step 4: Configure Pop-up Triggers Once you’ve designed the visual aspects of your pop-up, it’s time to configure the triggers. Triggers define the conditions under which the pop-up gets displayed to visitors. Popup Maker offers various trigger options, such as button-based triggers, page-load triggers, click triggers, and scroll triggers.
For example, you can set the pop-up to appear after a specific time delay, when a user is about to leave the website, when a button gets clicked, or when the user scrolls down a certain percentage of the page.
Step 5: Set Extra Options In addition to triggers, you can also define display rules to control where and when the pop-up should display. Display rules help you target specific pages, posts, or sections of your website.
Moreover, you can configure display rules based on URL conditions, referring websites, user roles, device types, or any other criteria that align with your requirements. For instance, you might want the pop-up to appear only on the homepage, specific blog posts, or when a user is visiting from a particular referral source.
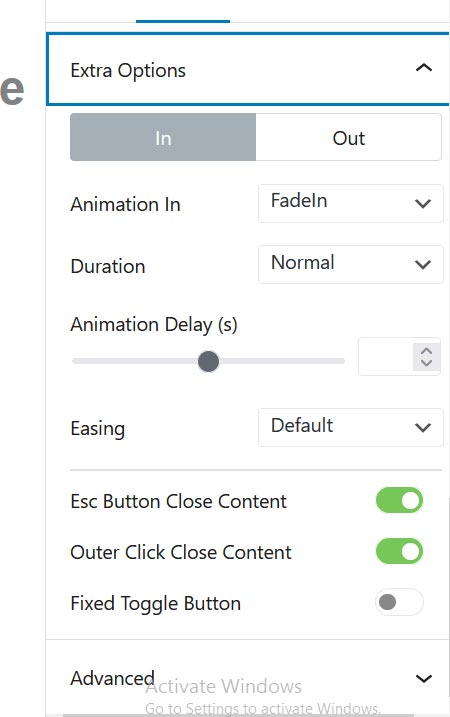
Step 6: Customize the Pop-up Behavior Popup Maker allows you to customize the behavior of your pop-up using various settings. You can define the close button style, choose whether to display a close button or not, set the position of the pop-up on the screen, and configure the animation effects.
Step 7: Save and Publish Once you’re satisfied with the design, triggers, display rules, and behavior of your pop-up, save your changes. Finally, publish the pop-up. Popup Builder will generate a shortcode or provide you with a block to insert the pop-up into your desired location.
You can insert the block into any page, post, or template area on your WordPress website. Simply navigate to the respective content editor, add a new block, search for the Popup Builder block, and insert it. Furthermore, you can then select the desired pop-up from the available options.
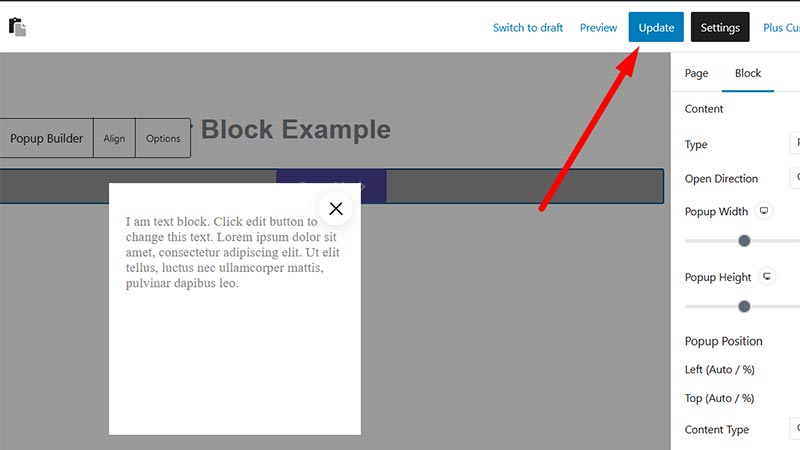
Great! You’ve successfully created a pop-up using Gutenberg in WordPress. In a nutshell, Gutenberg, in combination with a powerful pop-up plugin like The Plus Blocks, provides an intuitive and user-friendly way to create eye-catching pop-ups for your WordPress website.
Conclusion
Finally, we have listed some of the best ways how you can create a pop-up builder on a WordPress website. However, there are many plugins that you can use for creating custom pop-up designs in WordPress. If you are a developer or a designer then you can easily make pop-up templates in WordPress without using a plugin.
In addition, there are Elementor addons and Gutenberg Block plugins that make life easy for designers to build a custom pop-up template in WordPress.
Now over to you,
How are you creating pop-up form triggers in WordPress?
Are you using a pop-up builder plugin for your WordPress site?
Please let us know your thoughts and follow us on Facebook and Twitter.
