Looking to create a custom field in WordPress is easy with easy steps.
Creating a custom field in WordPress can greatly enhance the flexibility and functionality of your website. Custom fields allow you to attach additional information to posts, pages, or custom post types, which can be used to display, sort, or filter content as needed.
In this comprehensive guide, I’ll walk you through the process of creating and utilizing custom fields in WordPress.
What are Custom Fields?
In WordPress, custom fields (also known as post meta or custom metadata) are a way to store and display additional information associated with a post, page, or custom post type. They allow you to add extra data to your content beyond the standard title, content, and other default fields.
Custom fields are primarily used for scenarios where you need to attach specific data to a post that doesn’t fit within the standard content structure. This could include things like:
- Additional Information: Storing information like author information, publication date, event details, etc.
- Metadata: Storing SEO-related information like meta descriptions, keywords, and custom Open Graph or Twitter Card tags.
- Customization: Storing settings that are specific to a post or page, like featured image captions, sidebar placement preferences, etc.
- Data Display: Associating extra data with a post that you want to display on the front end, such as prices, ratings, related products, etc.
To use custom fields in WordPress:
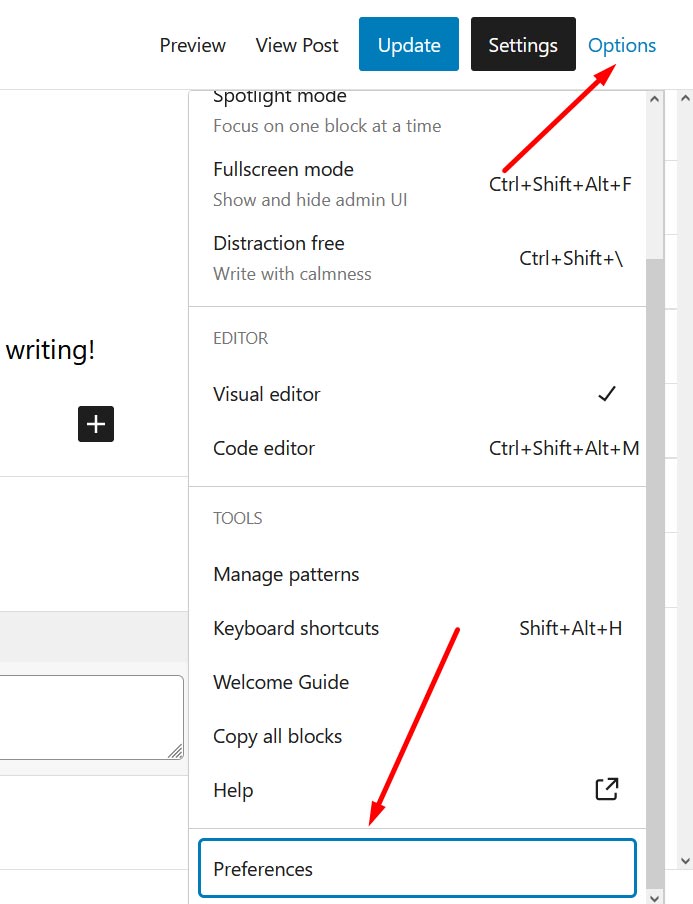
- Edit a Post/Page: When creating or editing a post or page, you’ll find the “Custom Fields” section below the content editor. If you are using Gutenberg editor you need to enable the option from the sidebar Options >> Preferences and from the Panel (tab) enable the custom fields options
- Add a Custom Field: In the “Custom Fields” section, you can add a key-value pair. The key represents the name of the custom field, and the value is the data you want to associate with it.
- Display Custom Field Data: To display the custom field data on your website, you need to retrieve it using template tags or functions within your theme files. The most commonly used function is
the_meta().
Here’s a simple example of how you might use custom fields:
For instance, you have a website that reviews books. You could create a custom field named “Author” and attach the author’s name to each book review post. Then, in your single post template, you can use the_meta()it to retrieve and display the author’s name.
However, keep in mind that while custom fields are powerful, excessive use of them might complicate your content management. In some cases, it might be more efficient to consider using custom post types or taxonomies if you have more structured data needs.
In addition, WordPress is a continually evolving platform, and the user interface and features might change over time. It’s always a good idea to refer to the official WordPress documentation or resources for the most up-to-date information.
Create a Custom Field in WordPress:
There are several methods to create a custom field in WordPress:
Using the Default Custom Fields:
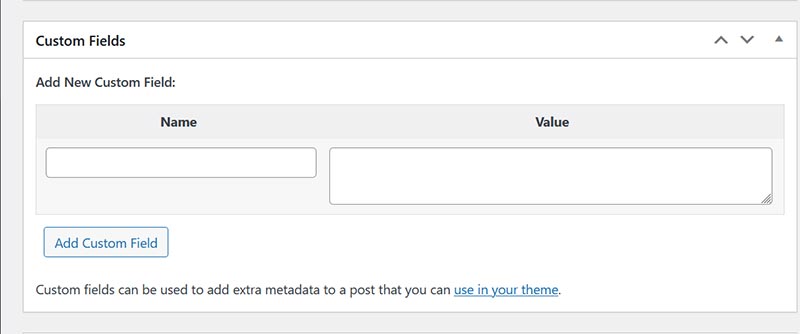
- While editing a post or page, scroll down to the “Custom Fields” meta box.
- Enter a name for your custom field (e.g., “custom_field_name“).
- Enter the value for your custom field (e.g., “custom_field_value“).
- Click the “Add Custom Field” button.
Using Plugins:
Plugins like “Advanced Custom Fields” and “Custom Field Suite” provide user-friendly interfaces to create and manage custom fields. Install and activate the plugin of your choice, then follow the plugin’s documentation to create custom fields.
Displaying Custom Fields:
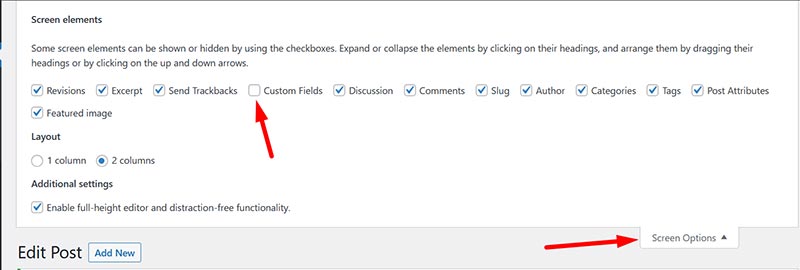
You can display custom fields in different ways:
In the WordPress Editor:
- While editing a post or page, click the “Screen Options” tab at the top of the screen.
- Check the “Custom Fields” option.
- Scroll down to the “Custom Fields” meta box.
- You’ll see a list of custom fields associated with the content.
In Theme Files:
- To display a custom field in your theme, use the
the_meta()function in your template files:
<?php the_meta(); ?>
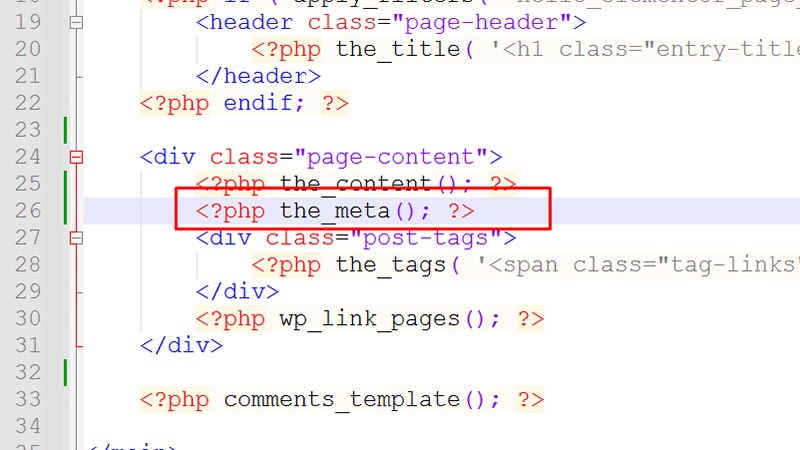
NOTE: I want to show the field in the single blog post page so I have edited the “\wp-content\themes\theme-name\template-parts\single.php” file
Advanced Usage of Custom Fields:
Conditional Display: You can use custom fields to conditionally display content. For instance, show a special message if a certain custom field value is set.
Sorting and Filtering: Custom fields can also be used to sort or filter content. For example, you could create a custom field for a “release date” and then sort a list of posts by this field.
Best Practices for Using Custom Fields:
- Consistency: Establish a naming convention for your custom fields to keep them organized.
- Validation: Validate and sanitize user input to prevent malicious code injection.
- Theme Independence: If you change themes, your custom fields should still work and display correctly.
- Performance: Be cautious when using too many custom fields as they can impact your site’s performance.
How to create a custom field using a plugin?

Creating a custom field using a third-party plugin in WordPress is a valuable way to extend the functionality of your website without diving into complex coding. Besides, custom fields allow you to add additional data to your posts, pages, or custom post types, which can then be used to display information in a customized manner.
Here, we’ll walk you through the process of creating a custom field using a third-party plugin in WordPress. We’ll cover the following steps:
Choosing a Plugin:
There are various plugins available for adding custom fields to your WordPress website. Some popular ones include Advanced Custom Fields (ACF), Pods, and Toolset Types. For this guide, we’ll use Advanced Custom Fields (ACF) as an example.
Installing and Activating the Plugin:
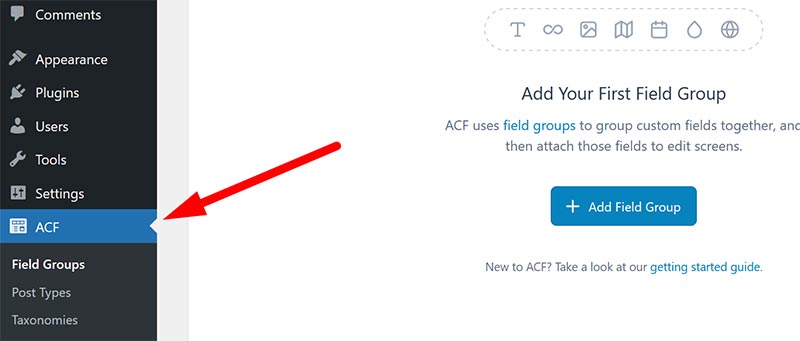
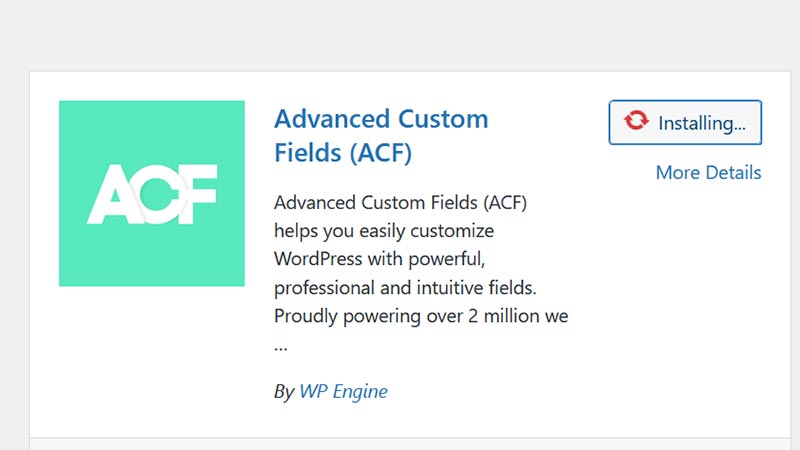
To get started, log in to your WordPress admin dashboard. Navigate to “Plugins” > “Add New.” Search for the “Advanced Custom Fields” plugin, install it, and then activate it.
Creating a Custom Field Group:
ACF uses the concept of “Field Groups” to group related custom fields together. Start by creating a new field group:
-
- Go to “Custom Fields” in your WordPress dashboard.
- Click on “Add New” under “Field Groups.”
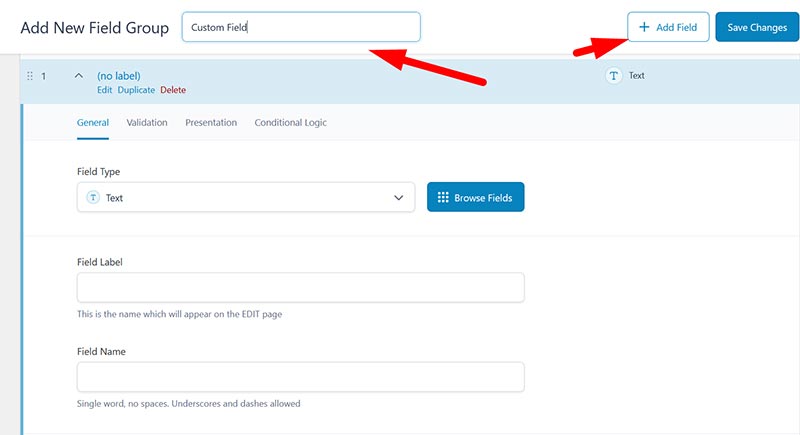
- Give your field group a meaningful title (e.g., “Book Details”).
- In the “Location” section, you can specify where the custom fields will appear (e.g., Posts, Pages, Custom Post Types).
- Click “Add Field” to start adding custom fields to your group.
Adding Custom Fields:
ACF provides various field types, such as text, textarea, image, select, and more. Let’s say you want to add a custom field for the author’s name:
-
- Click “Add Field.”
- Enter a label for the field (e.g., “Field Name”).
- Choose a field type (e.g., Text).
- Configure any additional settings for the field, such as a default value or character limit.
- Click “Save” to add the field to the group.
Configuring Field Display:
You can define where and how the custom fields will appear when editing posts or pages. This is known as the “Location Rule.”
For instance, you might want the “Field Name” field to appear when editing posts in the “Posts” category:
-
- Click the ” Add Rule Group” button in the “Location” section of the field group.
- Choose the appropriate rule, such as “Post Type” > “is equal to” > “Posts.”
- Click “Publish” to save the field group.
Displaying Custom Field Data:
After setting up your custom fields, you’ll want to display their data on the front end of your website. This can be done within your theme’s template files using ACF functions or shortcodes:
-
- In your theme files (e.g., single.php for single post view), use the get_field() function to retrieve and display the custom field data.
$field_name= get_field(‘field_name’);
echo ‘Field Name: ‘ . $field_name;
Styling and Formatting:
You can use CSS to style the displayed custom field data to match your website’s design. Additionally, ACF offers filters and options for formatting the output of custom field data, such as dates or numbers.
Advanced Customization (Conditional Logic, Repeaters, etc.):
ACF provides advanced features like conditional logic, repeater fields, and flexible content fields. Furthermore, these features enable you to create complex layouts and dynamic content structures using custom fields.
Testing and Debugging:
It’s important to thoroughly test your custom fields on different devices and browsers to ensure consistent functionality and display. If you encounter any issues, check for conflicts with other plugins or your theme.
Backing Up and Updating:
Always keep backups of your website and regularly update both WordPress and the plugins you’re using, including the custom fields plugin, to ensure security and compatibility.
In conclusion, using a third-party plugin like Advanced Custom Fields simplifies the process of creating custom fields in WordPress. This approach allows you to extend your website’s functionality without writing extensive code. Furthermore, by following the steps outlined in this guide, you can effectively create and manage custom fields to enhance your content presentation and user experience.
How to manually add a custom field in WordPress?

Manually adding a custom field to WordPress posts or pages involves adding some code to your theme’s template files or using a plugin. In other words, if you are a WordPress newbie then it would be better to handle the things by professionals.
Method 1: Using Theme Files (Recommended for Developers)
- Access Theme Files: Access your WordPress site’s files using an FTP client or through your hosting control panel. Navigate to the folder containing your active theme, usually located in wp-content/themes/your-theme-name.
- Edit Template File: Choose the template file where you want to display the custom field. Common choices are single.php for single posts or page.php for pages. You can also create a new template file if needed.
- Add Custom Field Code: Inside the selected template file, find the loop that displays the content of the post or page. You can use the following code to display a custom field named “custom_field_name“:
<?php
$custom_field_value = get_post_meta(get_the_ID(), ‘custom_field_name’, true);
if (!empty($custom_field_value)) {
echo ‘Custom Field Value: ‘ . $custom_field_value;
}
?>
- Replace ‘custom_field_name‘ with the actual name of your custom field.
Method 2: Using a Plugin
If you’re not comfortable editing theme files directly, you can use a plugin to manage custom fields:
- Install a Plugin: Search for and install a plugin that provides custom field functionality. A popular choice is “Advanced Custom Fields.”
- Create a Field Group: After installing the plugin, create a new “Field Group” from the plugin’s settings in the WordPress admin panel. Define the fields you want to add to your posts or pages.
- Display Custom Fields: Once you’ve set up the field group, the plugin usually provides a way to display custom fields on your posts or pages using shortcodes, template functions, or by automatically integrating them into your theme’s template files.
To summarize, using plugins is generally easier and safer for those not familiar with coding, but it might introduce some overhead and potential compatibility issues with future WordPress updates. If you’re comfortable with coding, modifying theme files directly offers more control.
Above all, make sure to back up your site before making any significant changes and test your changes on a staging site if possible, especially if you’re new to coding or WordPress customization.
Why custom fields are needed in WordPress posts?

Custom fields in WordPress posts provide a way to store and display additional information that doesn’t fit within the standard content structure of a post. They are essentially key-value pairs that allow you to associate extra data with a post. Custom fields are useful for a variety of reasons:
- Flexible Content: WordPress is primarily built to handle traditional content like text, images, and videos. However, websites often require additional data beyond these basic types. Custom fields allow you to store and display diverse types of data, such as ratings, prices, event dates, locations, and more.
- Structured Data: Custom fields help you organize content in a structured manner. For example, if you’re running an event website, you can use custom fields to store details like event date, venue, ticket prices, etc. This data can then be easily displayed in a consistent format across all event posts.
- Customization: With custom fields, you can create unique layouts and designs for different types of content. You could have a specific field for a featured image, allowing you to style and position it differently from the main content.
- Filtering and Sorting: Custom fields enable you to filter and sort content based on specific criteria. This is particularly useful for building directories, databases, or any type of content where users might want to find information based on certain attributes.
- Integration with Plugins: Many plugins and themes in WordPress utilize custom fields to extend functionality. For instance, an e-commerce plugin might use custom fields to store product details like SKU, price, and stock level.
- Automation: Custom fields can be used to automate certain processes. For example, you could create a custom field for expiration dates on posts and then set up automatic archiving or removal of posts after their expiration.
- SEO and Meta Information: Custom fields can be used to store meta information, like meta descriptions or meta keywords, that can contribute to SEO optimization and improve how your content appears in search engine results.
- User-friendly Content Entry: Custom fields can make content entry more user-friendly, especially when dealing with complex data. Instead of having users manually format and structure data in the main content area, custom fields provide specific input fields for different types of data.
- Extensibility: Custom fields provide a way to extend the default WordPress functionality without modifying core files. This means you can add specific features to your site without altering the core codebase.
In a nutshell, to use custom fields effectively, you might need to combine them with plugins or themes that allow you to easily manage and display the data. Additionally, one common way to work with custom fields is by using custom field plugins or page builders that provide user-friendly interfaces for adding, editing, and displaying custom field data.
Conclusion
Custom fields are a powerful tool in WordPress that allows you to extend the capabilities of your website. Whether you’re displaying additional information, enabling conditional content, or enhancing sorting and filtering, custom fields offer a flexible way to manage your content. By following best practices and utilizing available plugins, you can create a seamless and efficient system for managing custom fields on your WordPress site.
Besides that WordPress evolves, and the user interface may change over time. Be sure to consult the latest documentation and resources to stay up to date with the best practices and tools for working with custom fields.
Now, over to you,
Which method you are using to create a custom field on the WordPress site?
Which popular plugin you are using to create a custom field in WordPress?
Please let us know your thoughts and follow us on Facebook and Twitter.

