
Thinking of purchasing ListingPlus WordPress theme by Templatic?
You have read Directory theme Review by Templatic. I have mentioned that there are many child themes supported by the Directory theme.
I’m here and so excited to announce that Templatic has created one of the best child themes that I have ever dealt with and seen it.
If you are new to WordPress then you can check on this post here as Beginners Guide on WordPress. You can know more about WordPress features and how to create a beautiful WordPress site.
If you have not got the perfect hosting for your site then I would recommend Bluehost as the hosting service provider where you can install WordPress themes and plugins.
Though the features and functionality of the child theme are the same as what the parent Directory theme offers but if you check out the demo of the theme you will be so amazed and liked by the design and creativity that they have brought to the theme.
Introduction
Yes, I’m here to provide a brief review of the ListingPlus WordPress theme by Templatic and you can check out the demo that they have created. At first glance, you will see that the theme is somewhat like the ListingPro theme. But I would tell you that it is not.
What I liked on the ListingPlus WordPress theme is the homepage Banner where you can see the video playing in the background. Many themes provide HomePage Map or Banner/Slider on the homepage and so as Directory theme which they had also provided the same.
You can see the design and layout it is much different than the rest of the child themes of the Directory parent theme.
So, without further ado let’s check out some of the features and functionality of the ListingPlus WordPress theme.
ListingPlus WordPress theme Features
As mentioned earlier that the ListingPlus WordPress theme is a part of the Directory parent theme so most of the features that you see on the Directory parent theme would be available on the child theme as well.
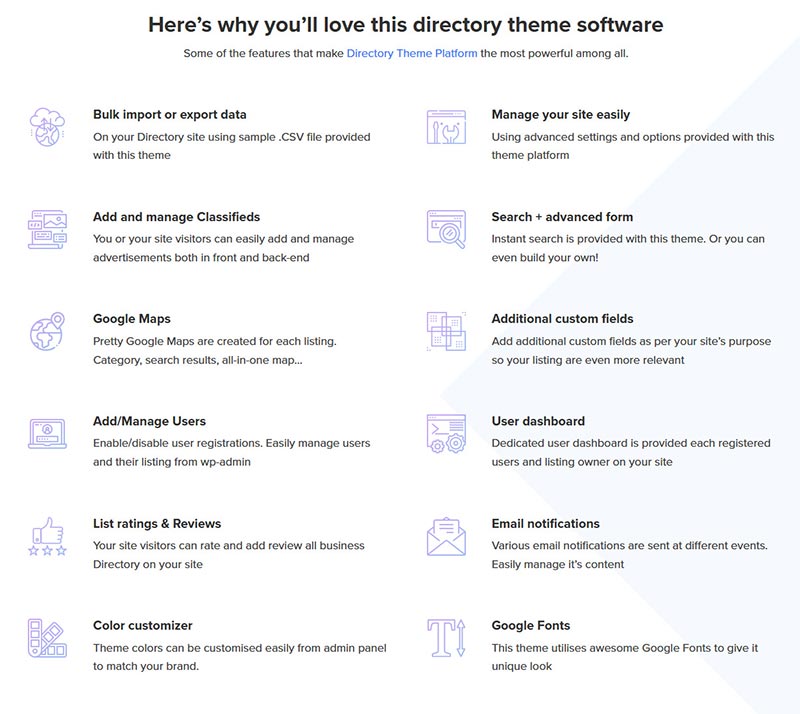
When creating a website you will be looking for all the features that you need to make a perfect niche website. Using the ListingPlus WordPress theme you can create any type of website like Hotels, Places, Museums, and any Business website.
You will be looking for search functionality, monetizing the site, Featuring the listing or post, SEO optimized, managing the site, manage users, Google Maps, adding comments & ratings, email notifications, customization, and everything that you can do to build a powerful and best ListingPlus WordPress Directory based website.
You can have and add 25+ directory plugins to make your website stand out against all the other Directory theme providers.
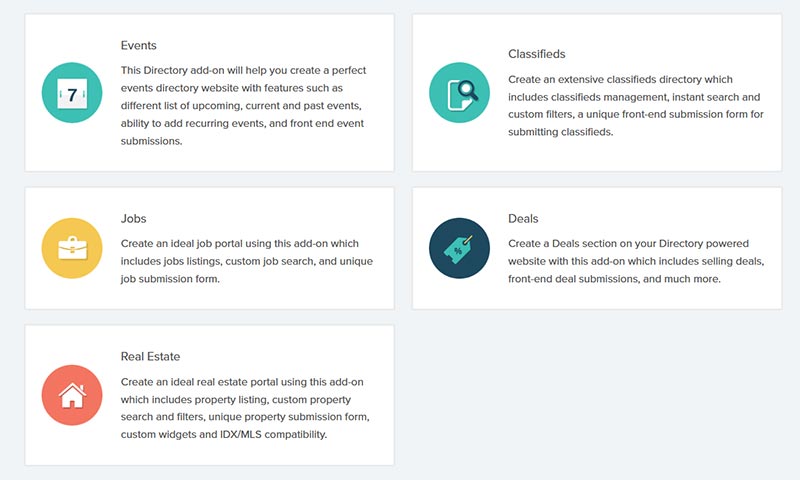
Templatic’s ListingPlus Directory theme has many extended features which you can add by installing add-ons to make classifieds website, events website, property website, job portal, deals website and many extensions that you can use to make your listing plus directory website more advanced with rich features.
Like the Directory theme Templatic’s ListingPlus WordPress child theme support Tevolution core plugin. You can get many elegant features like creating custom fields, custom post types, payment gateways, custom permalinks, page customization, and moreover you can add as many as Directory add-ons on your site since the theme supports many great add-ons and features.
This listing plus child theme supports many great features and add-ons like List Filter, Ad Manager, Access Manager, and moreover that you can create your Directory website globally recognized using the Location Manager plugin.
Supported Plugins for the ListingPlus WordPress theme
Since it is a child theme of Templatic’s Directory theme it is not just a theme as it is a platform. You can create hundreds or thousand of posts and establish a core business locally and globally to showcase the website. With many features with add-ons that can help you create a great Directory website.
- Events: This Directory-based add-on helps you to create an awesome Events website showcasing events based on particular dates. You can show the events based on past, current, and upcoming dates. You can show the events based on regular events or the same events which can be recurring on particular dates.
- Classifieds: Create a beautiful Classifieds website using this Directory add-on. You can create your Directory website like Craig-list and showcase all the classified ads on your site.
- Property: Now you can create a Real Estate website in minutes using the Directory add-on. You can ask a user to pay to submit their property to be showcased on your Directory website. With property filter, property status, and property-based widgets that you can use on your Directory website.
- Deals: You can submit deals-related posts based on different deal types like an affiliate link, coupon deal, email/print, and digital product that you can show on your website.
- Jobs: Create a Job Portal website with this Directory add-on. With this add-on, you can create a job portal website in minutes. You can show job types, create frontend submission, advanced job search, job application via email, and many awesome Directory features that you can use for your site.
You can also create an advanced based Directory website with many extensions like Field Monetization, Global Location, Map Customizer, Header Fields, Tabs Manager, Location Slider, and many more.
Installation charges for ListingPlus WordPress theme

The installation service is common for all theme purchases. The theme is easy to install and user-friendly. With the EasyInstall feature that they provide, you can install the theme bundle in one go.
You can download the theme from your member’s area and the theme will be available in a zip format. Once you log in to your WordPress admin dashboard navigates to Appearance >> Theme. You can install the ListingPlus WordPress Child theme, Directory theme, Tevolution Plugin, Tevolution – Directory Plugin, and Tevolution – Location Manager Plugin in one go.
Without Directory parent theme none of the Child themes will be actively installed on your WordPress site.
Same like Directory parent theme once you activate the theme you will see a separate post type for Listings. And you can submit your listings from both frontend and backend submissions. You can monetize and make money with the price packages that you create and based on the currency and payment gateways that you choose for payment.
For all the settings you can have the video tutorial and detailed guide which you can access and learn as to how you can use these features on your site. The guide has been provided with screenshots and easy to understand language that can be easier for beginners to understand.
If you need to save time from all this headache you can contact Templatic itself to make an installation process for you. Their Basic Installation price is $59 and which can be extended to $199 with a 3-hour consultation service with their WordPress Support member via email or Skype chat.
Key Features
After the installation process, you will be having many features which you can use for creating a powerful Directory website. Some of the key features will be mentioned here so that you can learn and see as what Templatic’s ListingPlus WordPress theme offers and why I was so excited to write the review on this product.
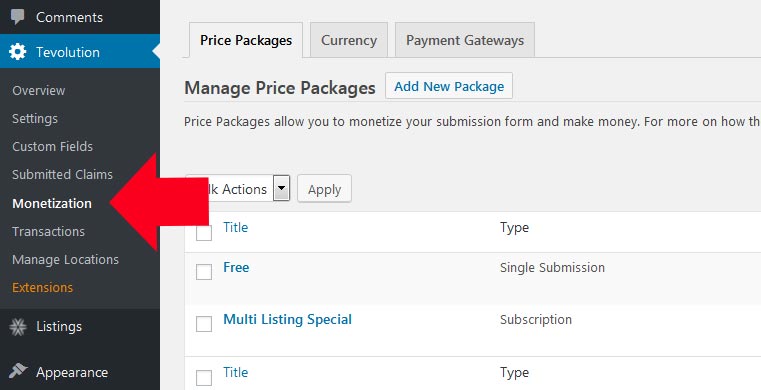
Monetizing the ListingPlus theme
Price Packages
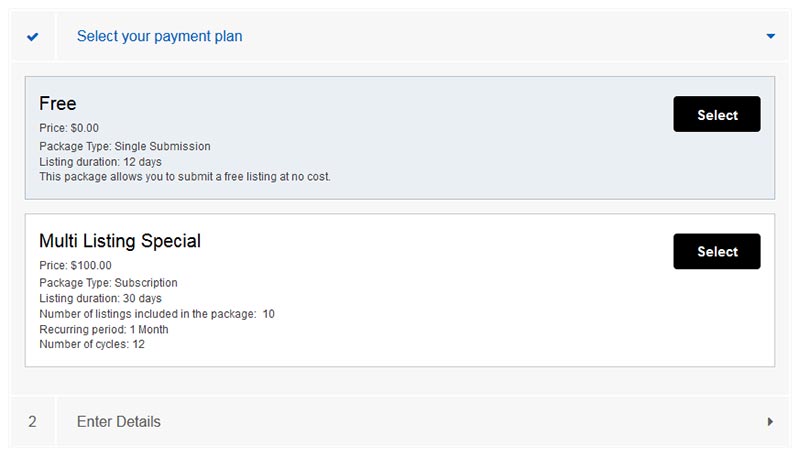
If you are creating a Directory website then you will be looking for monetizing your website and making money from your website. The best way is that you can create as many as price packages from the backend and set up the pricing options.
Whether it is a single submission or a subscription package you can add the amount, set up the duration of the package, if needed you can set up the recurring payment for the existing listing that you can show on your site.
Featured Listings and Settings
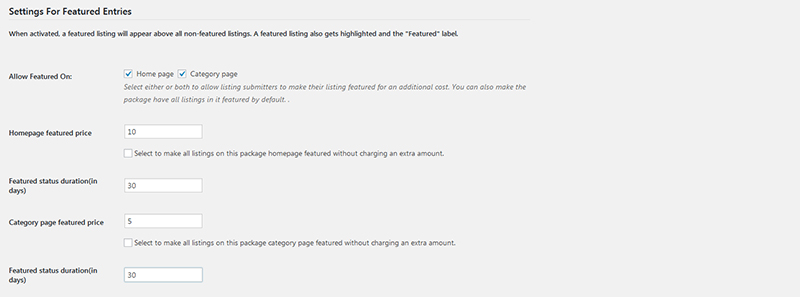
If you are looking to get extra revenue you can add the functionality for featuring the listing on your site. If any user needs to show their listing unique and featured on top of the other listings they need to pay extra to get their listings featured.
You can enable the setting from the backend when creating a price package you will see the Featured Settings where you can check the option whether you need to show the listings featured on the Homepage or Category page. You can enter the amount and duration for how many days you need to feature those listings on your site.
Once you set up the Featured listings settings you will see the option on the submission page where they can check the option to feature the listings either on the Homepage or Category page. It is not mandatory to check those options on the homepage it is just an additional feature if you need to showcase your listings as Featured or not.
In the same way, you can feature your listings by not paying a single amount and show the listings for a particular duration.
Currency Settings
Moreover, to that, you can set up the currency for which country you are located in and set up the settings as per your needs. If you are located and targeting the audience for US country then you can set the currency option as USD and the currency symbol is $ (dollar).
The only drawback that you can see is that if you are targeting multiple countries and trying to set up multiple currencies then it is not possible as Tevolution supports a single currency option that you can set up on your site.
Once you have made the payments all the transactions can be seen on the backend of your site where you can see who has paid for the post and how much amount and particular date the package is going to expire.
If the payment is single payment pr recurring you can see all the transaction details on the backend. You can also filter or search a particular transaction from the backend of your site.
Payment Gateways
Once you install the Tevolution core plugin you will be provided with default 2 payment gateways that you can use on your site. PayPal and PreBank Transfer are the 2 options that you can use on your site. You can find these options on the backend of your site Tevolution >> Monetization >> Payment Gateway (tab).
You can click on the setting where you can configure your payment gateway option where you can receive money to your account.
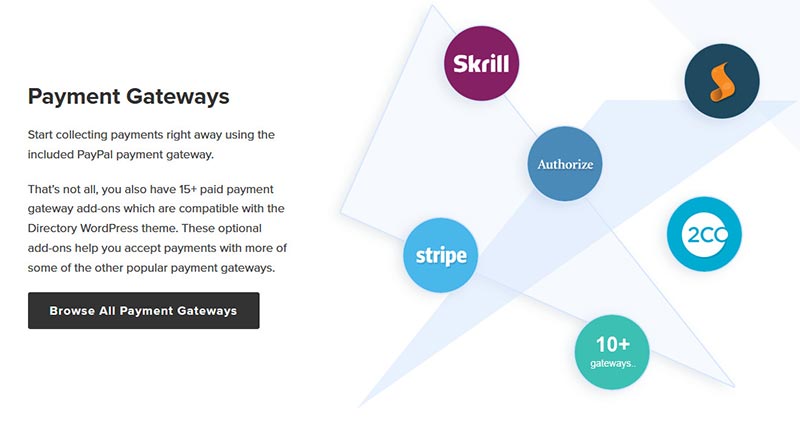
If you need to add more payment gateway option that suits your needs then you don’t have to worry about that as Templatic has as many payment gateway options that you can choose and integrate on your site.
Some of the popular ones are 2Checkout and Stripe payment gateways which are used worldwide and a lot more plugins that you can get with an additional purchase and set up on your site.
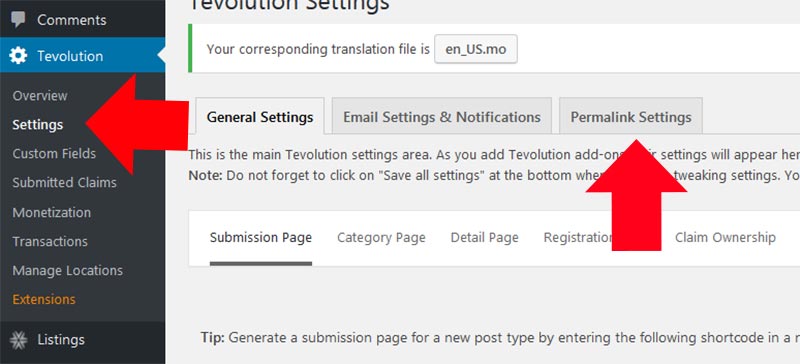
Tevolution Settings
On the backend section, you will see settings for Homepage, Category Page, Detail page, and Submission page.
Submission page settings are the options where you can manipulate the settings on the frontend submission form. If you have categories and you can show custom fields based on that category that you have on your site.
You can restrict the number of image size that the user needs to upload on your site. This will help if your site has a large amount of data and need to restrict the image size.
There are also many other options that you can show on the submission page like Terms & conditions. Furthermore, you can set the default status when someone submits a post if it should be live immediately or reviewed by the admin and many more.
Category Page options are normally dealt with the category pages of the site. This is one of my favorite parts where you can see different 2 variations of the category page for your site.
Enable the pinpoint functionality you will be seeing a different category page on the frontend. You will see the map on the right-hand side of the page and on the left-hand side, you will see the post.
To add the map on the right-hand side you need to add the T-category map widget inside the All Pages – Left Content widget area. Once you disable the Pinpoint functionality you will see a normal category page where you will see no map.
Although, you can still show maps on category pages by adding the T-category map widget on the Listing Category Page – Below Header widget area.

Other Settings
Detail page settings will show you what type of options to be shown on the detail page of the listings. You will see if you need to show the map tab on your site or not. As Google has started to charge for the Google API so it’s easy you can disable the map from your site.
You can show the social media icons on the detail page to share your post on social media. Enable rating options to give users to rate on your listings. You can filter and show related posts based on the distance that you set on the backend.
Registration Page option, if you need your users to register on your site with Social media. There are other settings that you can manage for users.
You can hide the admin dashboard bar from the backend so that you can see the full header of the site. You can hide the Login menu from the menu if you don’t need any person to register on your site which can also disable it from WordPress default settings.
If you are adding a post on behalf of other users you can have an option so that other users can claim the listings on your site. With the Claim ownership, you will see a button on the detail page of your site so that people can claim those listings on your site.
You can also charge for the listings if someone tries to claim for that listing using the Paid Claims plugin. All the submitted claim listings get displayed on the backend of the site in the Submitted Claims section. You can approve/decline/delete the claim that the user has made on the particular listing.
Custom Permalinks
If you need to rank high on Google then you need some permalinks settings. Using these settings you can make your website rank high on google and target specific pages of your website. With the Custom Permalink settings located on the backend, you can customize the permalinks as per your needs.
Either you can shorten the permalinks on the URL or you can add your own custom slug so that it can rank high on Google. These permalink settings are important from an SEO point of view. You can choose your own custom permalinks or remove the slug from the URL so that the URL of the site could be so long.
Location Manager Settings
One of the most key features that you need for your Directory website is if the website can be managed globally and locally. Here the Tevolution – Location Manager plugin comes into play where you can add cities as many as you can and make the site globally recognized.
Once you activate the plugin you will see the Manage Locations option on the Tevolution section. On the Manage Location section, you will see the tabs related to Manage Locations on your site, Countries, States, Cities, and City Logs.
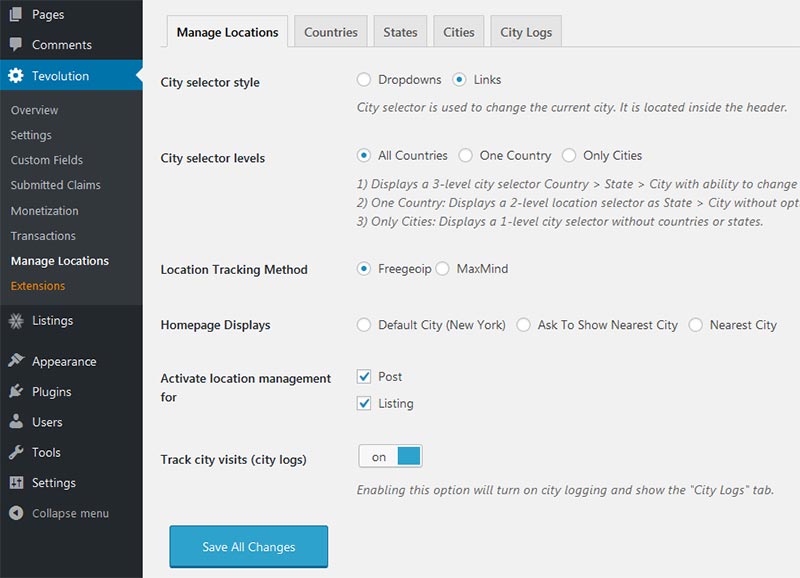
On the Manage Locations section, you can choose how you need to show the city selector levels and style on the homepage header area. You will see the city selector level on the header area, where you can either show city as a dropdown or with links.
You can choose the city selector style and levels based on the location that you are targeting your audience. When any user visits your site you can show where a user gets redirected.
You can make your city as default, ask to show the nearest city, or directly take them to the nearest city from where they are located. By default, the countries and states will be pre-loaded with the plugin activation so you just need to add cities manually from the backend. I know adding cities manually would take you a long time and you need to Directory theme setup in minutes.
Compatible Plugins related to Location Manager
Thanks to Templatic Bulk Import Export Plugin where you can add all the data related to cities and import them to your site. But wait a minute, doesn’t adding data manually will also take me a long time and hectic process.
I bet you are right so you can check on the CSV Repository which many of Templatic’s users send them and you can use the same CSV file on your site.
If you don’t want to create your site Globally, then you can deactivate the Location Manager plugin where you can make the site a Single City. Once you deactivate the plugin you can see an option on Tevolution >> Settings >> Map Settings. You need to add the MAP API Key and other settings that you need to show on your site.
In any case, whether you are using the Location Manager Plugin or not you need to get the Map API key so that you can show proper map pins on your site.
Another awesome feature that you can have with the Location Manager plugin is that you can use the Global Location plugin. So, what does this plugin do? With this plugin activated you can enable the site as Global City on the homepage. If you need to show all your listings no matter which city you are located in using this plugin it is possible.
You can also set the Global Location as your default Homepage. When a user visits the site they could see all the listings no matter where the listings get assigned.
Security Settings
Security is a major concern for all WordPress websites and even Templatic provides a way where you can enable Captcha on the site. You can show the captcha on the Registration page, Contact Form and Comment form, Submit listing page, Claim Ownership, Email to Friend and Send Inquiry forms.
You just need to add the Google Captcha key on the backend Settings and you will see the Captcha on the above pages. Furthermore, the code that Templatic had used to build Directory themes and all its themes are clean. It has an in-built security check and is developed with WordPress coding standards. You don’t need to worry about hackers hacking on your site or getting spam user registration on your site.
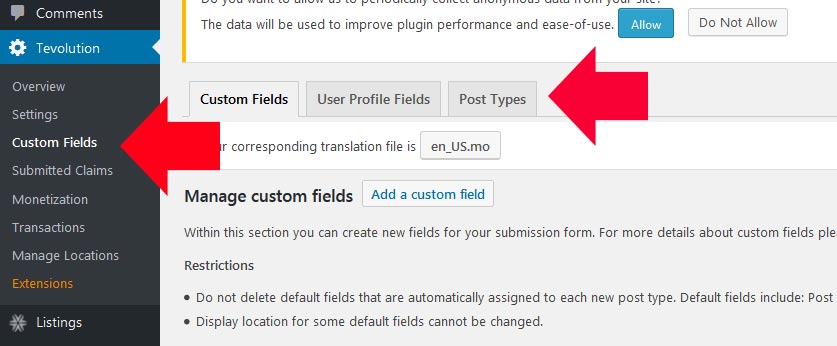
Custom Fields and Post Types for ListingPlus theme
Custom Post Types
Tevolution offers custom post types settings for creating a new post type on your site. You can create as many post types on your site and integrate a submission page so that you can show submission forms on your site.
You can find this option on the backend Tevolution >> Custom Fields >> Post Type (tab) and Add new post type. Once you create a new post type you can add categories and set up as default plugin listings post type on your site and you can generate a submission page.
Once you put this shortcode on the Add New page you will see the submission for the new post type. You can create a price package for the custom post types that you have created for your site.
Custom Fields Settings
Just like creating a new post type you can create custom fields for the existing post type and for the new post type as well. You can also restrict custom fields based on the price packages that you have created on your admin panel.
And the answer is YES, an amazing plugin called Field Monetization. You can use it for restricting custom fields based on the price packages available on your site.
You can set this option on the backend of your Monetization settings by editing the price packages. Check the custom fields which you need to show for that price package.
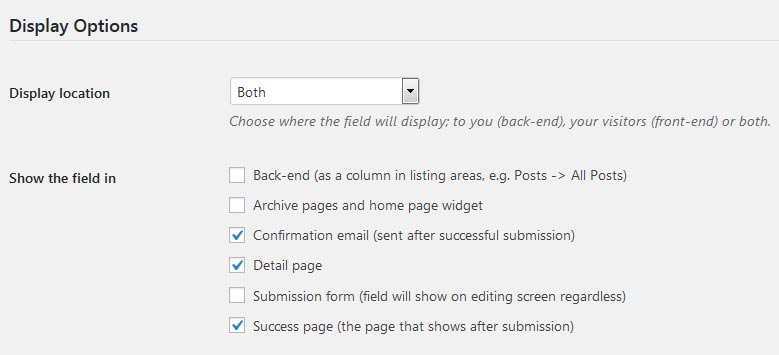
Apart, from managing custom fields you can also edit the custom fields where which field should be shown on the relevant pages.
First, edit the custom fields and scroll down, you will see Show Field in and select where you need to show that custom field. Also, you can put validation on the custom fields on the submission page.
User Frontend Experience
When a user visits your ListingPlus WordPress theme Directory website they will see the Homepage Banner video. The video that has been used on the sample using the GoPro camera.
The whole homepage is full width so you cannot see any sidebar options. But you can change the layout from full width to two columns left or two columns right by editing the homepage from the backend Pages >> All Pages section. You will see attractive menus and beautiful icons overlapping the video banner. You can link the categories of your site directly to the category page.
The Front-end user experience is awesome even in mobile app view. You can enable the option from the admin dashboard of your site Appearance >> Theme Settings option. There are many other settings that you can enable like Breadcrumbs and the sticky header from the theme settings.
Frontend Submission Page
You will see price packages that you have created on the Monetization settings. It will show the price packages and then the custom fields that you have on the Tevolution >> Custom Fields section.
(Note: If you are choosing a subscription price package it will ask you to register. Furthermore, it will ask for a payment, adding values to the field comes later once admin approves your payment)
Once you fill in all the details you can check the Terms & Conditions. You can enable/disable it from the admin dashboard. Finally, it will ask for user login or registration if you are a new user and you will ask for payment.
After payment, it will greet you with the Thank you or Success Page. This page will show all the information of the purchase details that you have made. Furthermore, it as a user you will also be getting the email notification of your submission and to the admin.
The Email & Notification Settings can get managed from the backend of your site Tevolution >> Settings >> Email & Notification Settings (tab). You can only change the text but do not tamper with the shortcodes as it will only work with the default email templates.
Widgets Settings on Admin Dashboard
Homepage Widgets: The Homepage is fully widgetized where you can add as many widgets on the Homepage’s main content area. You can show Featured Listings, Blog posts,s and many other widgets that you can use on your site.
On the homepage, you can add any type of widgets that are suitable best for your needs.
If you don’t need to show the Video on the banner area you can add a Homepage banner for images/slider. You can show Sliding images and banners and also a T-Homepage Map widget to show a map with pins on the map showcasing your website listings.
Category Page: It has 2 variations that you can use on the category page. One is showing maps on the right-hand side and shows posts on the left-hand side. The other is the default category page and is provided for all the child themes with a sidebar.
You can show the Category map below the menu using the T-category map widget and show listings in a Grid view or list view. Along with that, you have a specific category page widget area where you can add widgets on the sidebar.
Detail Page: Detail page settings are managed from the backend. If you need to show or hide custom fields on the detail page you can do that by editing the custom fields from the backend option.
You can see fields on the main content of other child themes, but this theme shows the contents on the sidebar. It will show Google map, Claim Ownership button, Send to a friend, Send Inquiry button, and other social links fields.
ListingPlus theme Pricing
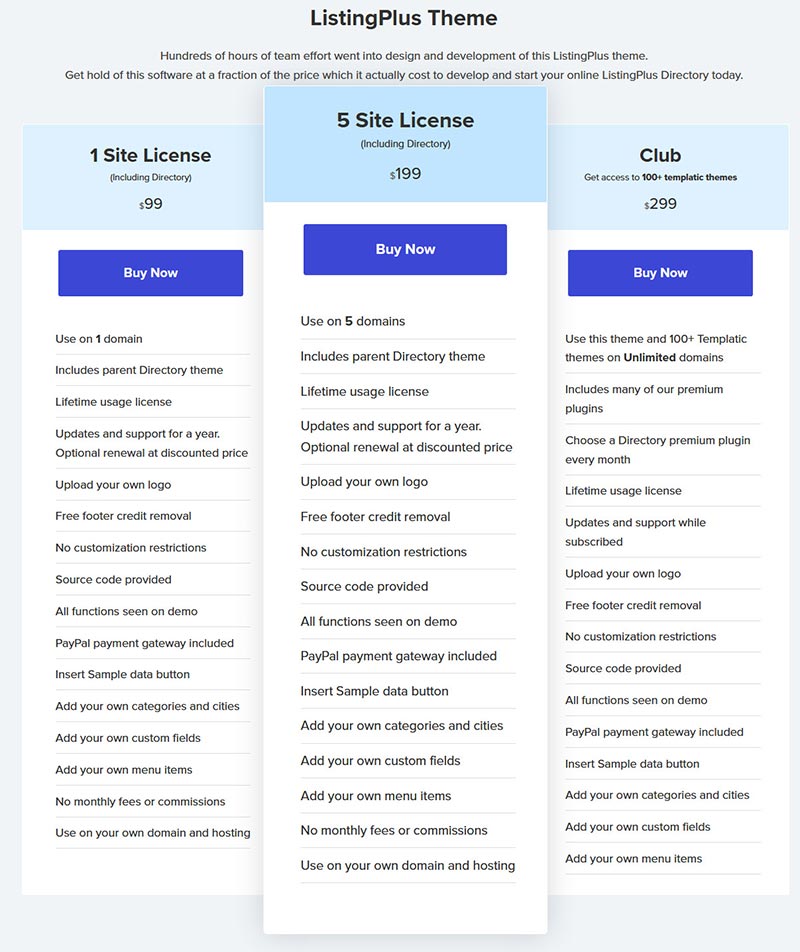
Now, If you are looking to purchase the ListingPlus WordPress theme there are 3 options that you can choose to get the ListingPlus theme.
- You can pay $99 for a single domain license
- You can pay $199 for a 5 domain license
- OR you can pay $299 to get full access of 90+ themes and an unlimited site license.
With the purchase of the theme, you can get all source code files and also you can full features with the theme. You can upload your own logo, install sample data to make the site like the demo, customize the site, change footer credits, source code available, and free 1-year update and support.
After the year of your subscription, your membership will expire and you need to pay for the renewal price to get support and updates but this can be optional since the theme is available and your site is live you can use the theme as long as you like.
Conclusion
Finally, I have listed all the core features and functionalities of the awesome ListingPlus WordPress Directory Child theme.
If you have planned out what type of WordPress website then this is the perfect theme and one of the best WordPress ListingPlus Directory themes provided by Templatic.
Templatic has many child themes included and you can choose any theme to create a perfect Directory website.
All the themes support and include directory add-ons where you can have advanced features on your site. If you are looking to monetize your website then you can have default payment gateways PayPal and PreBank Transfer. You can add as many payment gateways to use on your site based on the popularity and country that support it.
There are some small flaws which you might think that adding cities manually from the backend and even using the bulk import plugin you have to manually do the data entry on the CSV file.
Furthermore, the issues with the Google API key, if you need to have all the Google Map features on your site then you need to get the Google API key from Google which Templatic doesn’t provide.
You can use the theme for many purposes and as mentioned it has many impressive tools that you can use and though for a beginner there might be some issues or unable to understand the features you don’t have to worry about that because the theme has a well-documented guide and 24*7 support are provided to all the users who are active members.
Additionally, if you need to have a trial request to the theme just to check out how the theme looks and explore the admin dashboard you can contact their pre-sales team to provide you with a demo trial version of the theme.